✨ How To Do French Braid On Yourself Step By Step
Learning to French braid your own hair can seem like a magic trick, but it’s totally achievable. I remember countless hours in front of the mirror, tangling my fingers and getting frustrated. But with practice, it clicked.
This guide shares the practical method I used to master it, so you can too. You’ll soon be creating beautiful braids with confidence.

Quick Overview
Mastering the French braid on yourself gives you a versatile, elegant hairstyle. You’ll learn to seamlessly incorporate hair for a polished look.
- Time needed: 10-25 minutes (depending on practice)
- Difficulty: Intermediate (requires patience and practice)
- What you’ll need: Hairbrush, hair tie, optional: comb, mirror, styling product
Step-by-Step Instructions
Step 1: Prepare Your Hair
Begin with clean, tangle-free hair. French braids work best on hair that is either freshly washed and dried, or second-day hair with a little texture. Avoid hair that is too slippery or too oily.
Brush your hair thoroughly to remove any knots. Ensure it’s smooth from roots to ends. A good detangling session now saves frustration later.
Consider a light styling product, such as a texture spray or dry shampoo. This can add grip and make the braiding process easier, especially for fine or very silky hair.
Pro Tip: A little dry shampoo at the roots can add volume and grip, making it easier to hold sections while braiding. This is especially helpful for fine hair.
Step 2: Section the Crown
Stand or sit comfortably in front of a mirror. You might find it easier to use two mirrors, one in front and one behind, to see the back of your head.
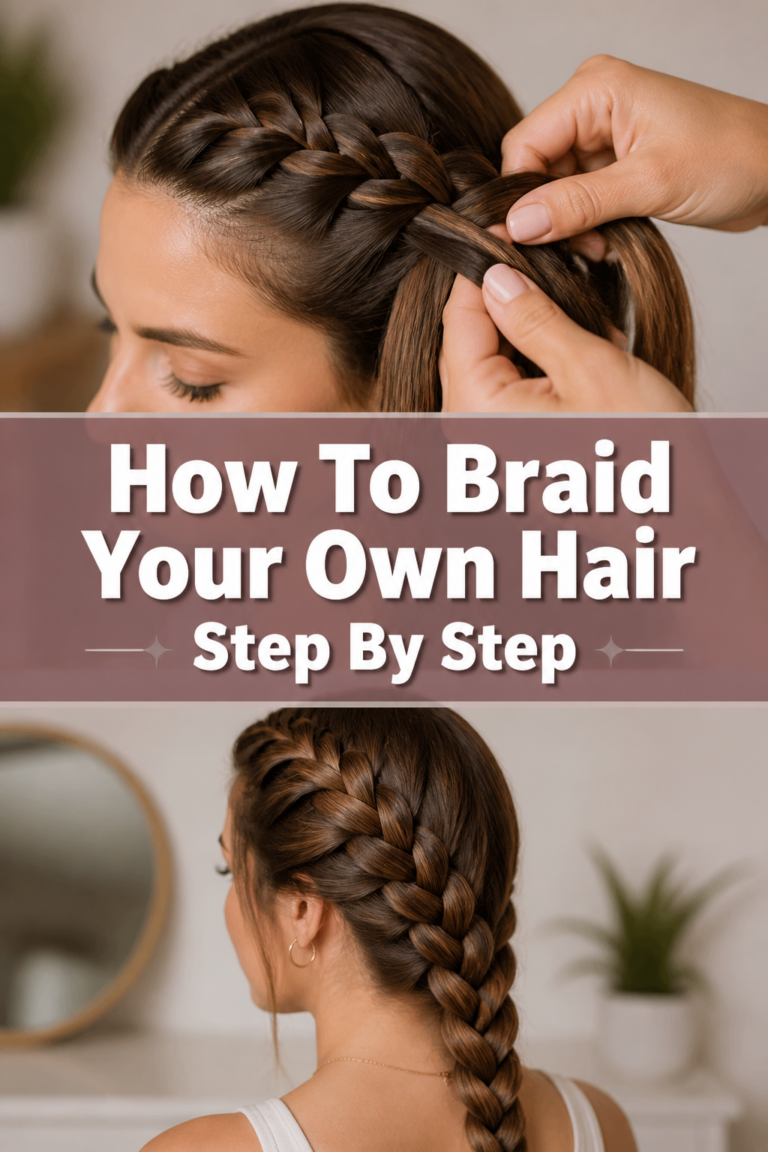
Gather a section of hair from the very top of your head, near your hairline. This initial section should be about two inches wide and two inches deep, forming a small triangle or square. This is where your braid will begin.
Ensure this first section is smooth and free of bumps. This foundation is crucial for a neat braid.
Step 3: Divide into Three Strands
Take the gathered section of hair from Step 2. Using your dominant hand, divide it evenly into three smaller, equal strands. Label them mentally as left, middle, and right.
Hold these three strands firmly but gently. Your index finger and thumb are often used to separate and hold the strands in place. Good separation is key to a clean braid.
Practice holding these strands without them slipping. This initial grip sets the stage for the rest of the braid.
Step 4: Start the Initial Braid
Cross the right strand over the middle strand. The right strand now becomes the new middle strand. This is the first step of a regular three-strand braid.
Next, cross the left strand over the new middle strand. This left strand now takes the middle position. You have completed one full “pass” of a basic braid.
Keep your grip firm to maintain tension. This prevents the braid from becoming loose or messy at the crown.
Step 5: Add Hair from the Right Side
Hold the three existing strands securely in your non-dominant hand. You’ll typically use your thumb and index finger to keep them separated.
Use your dominant hand to pick up a small, new section of loose hair from the right side of your head. This new section should be about half an inch wide and run parallel to your existing right strand.
Combine this new section of hair with the existing right strand. Now, cross this combined, thicker right strand over the middle strand. This is the hallmark of the French braid.
Pro Tip: When picking up new hair, aim for consistent, small sections. This creates a smooth, even braid texture. Larger sections can lead to a chunky or uneven look.
Step 6: Add Hair from the Left Side
Shift your grip again, securing the braided section. The strand that just moved to the middle is now the center.
With your dominant hand, gather a new, small section of loose hair from the left side of your head. This section should mirror the size and placement of the hair you added on the right.
Combine this new hair with the existing left strand. Then, cross this combined, thicker left strand over the middle strand. You are now incorporating hair from both sides.
Step 7: Continue Down the Head
Repeat the process from Step 5 and Step 6. Each time a side strand is about to cross over the middle, pick up a new section of loose hair from that side and add it to the strand before crossing.
Maintain consistent tension throughout. This is crucial for a neat French braid. If your hands start to ache, take a brief pause, but keep your grip.
Angle your hands slightly backward as you move down your head. This helps the braid lie flat against your scalp and follow the natural curve of your head. It takes some practice to get the hand positioning right.
Step 8: Incorporate All Loose Hair
Continue braiding, adding new sections of hair from each side, until all the loose hair from your scalp has been incorporated into the three main strands. You’ll notice the braid moving down your head.
Ensure that the last sections of hair you add are neatly picked up. Check around your ears and nape for any stray pieces.
Once all hair is integrated, you will be left with three distinct strands of hair. The “French” part of the braid is now complete.
Step 9: Finish with a Regular Braid
After all hair is incorporated, simply continue with a standard three-strand braid. Cross the right strand over the middle, then the left strand over the new middle.
Braid down to the desired length, typically to the ends of your hair. Keep the tension consistent with the French braided section above it.
Secure the end of the braid tightly with a hair tie. Choose a hair tie that matches your hair color or is clear for a seamless look.
Step 10: Refine and Loosen (Optional)
Once the braid is secured, gently tug at the loops of the braid. Start from the top and work your way down. This creates a fuller, softer, and more voluminous look.
Use your fingers to smooth down any flyaways. A light mist of hairspray can help keep everything in place for longer wear.
Check the braid in the mirror from all angles. Make any final adjustments to ensure it looks balanced and polished.
Common Mistakes to Avoid
Uneven Sections of Hair
Picking up inconsistent amounts of hair from the sides is a common pitfall. This results in a lumpy or unbalanced braid. Always aim for small, equal sections of hair each time you add to a side strand to ensure a smooth, uniform appearance. Practice makes this intuition stronger.
Losing Tension
Allowing the braid to loosen as you work your way down the head is another frequent issue. A loose braid can unravel easily and looks messy. Maintain a firm, consistent tension from start to finish, even if it feels a little uncomfortable at first. Your fingers will build strength over time.
Braiding Too Tight at the Scalp
While tension is good, braiding too tightly right at the scalp can cause discomfort, headaches, and even hair breakage. Aim for a snug but comfortable tension that allows the braid to lie flat without pulling excessively on your roots. Find that sweet spot between too loose and too tight.
Ignoring Flyaways and Bumps
Not smoothing out the hair before and during the braiding process can lead to stray hairs and bumps along the braid. Take the time to brush and comb your hair thoroughly. Use a comb to neaten sections as you pick them up, especially around the part line and temples, for a polished finish.
Troubleshooting
My braid keeps falling apart at the top.
This usually means you’re not maintaining enough tension on the initial sections. Ensure your grip on the three starting strands is firm. Also, when you first start adding hair, make sure those new sections are securely combined with the existing strands before crossing over.
I can’t see what I’m doing at the back of my head.
Using a second mirror can be incredibly helpful. Position one mirror in front of you and another handheld mirror behind you. This allows you to see the back of your head and guide your hands more accurately. With practice, you’ll develop muscle memory and rely less on visual cues.
My arms get tired before I finish.
French braiding your own hair is a workout! It’s normal for your arms to feel fatigued, especially when you’re starting out. Take short breaks if needed, but try to keep your hands in place so you don’t lose your progress. Building arm strength and endurance will come with consistent practice.
The braid looks messy and uneven.
This often comes down to inconsistent sectioning and tension. Focus on picking up consistently sized sections of hair each time. Also, ensure you’re pulling the strands with even pressure. Don’t be afraid to undo and restart if a section looks particularly uneven; it’s part of the learning process.
Key Takeaways
- Preparation is key: Start with detangled hair and consider a grip-enhancing product.
- Consistent sectioning: Aim for small, equal sections of new hair for a smooth braid.
- Maintain tension: Keep a firm, even grip throughout the braiding process to prevent looseness.
- Practice, practice, practice: French braiding on yourself takes time and muscle memory.
- Use mirrors: A front and back mirror setup can greatly assist your view.
- Refine the look: Gently tugging loops creates a fuller, softer appearance.
Frequently Asked Questions
Is it easier to French braid on wet or dry hair?
Most people find it easier to French braid on dry hair that has a little natural texture or has been prepped with a texturizing spray. Wet hair can be more slippery and prone to breakage if pulled too tightly. However, slightly damp hair can work for some, providing a bit more control than completely dry, silky hair.
How do I make my French braid look neater?
To achieve a neater French braid, focus on several key areas. Ensure your hair is thoroughly brushed and free of tangles before you start. Take very small, consistent sections of hair each time you add to the braid. Maintain even tension throughout the entire process, and use a fine-tooth comb to smooth down any bumps or flyaways as you go.
Can I French braid very short hair?
French braiding very short hair can be challenging but not impossible. Your hair needs to be long enough to section and cross over the other strands, typically at least chin-length or longer. With shorter hair, you’ll need to use much smaller sections and be very precise to ensure all hair is incorporated and held securely.
What if I only want a half French braid?
A half French braid follows the same initial steps. You would start at the crown and braid downwards, incorporating hair from the sides, just as described. However, instead of braiding all the way down your head, you would stop incorporating new hair around the ears or just above the nape of your neck. At that point, you’d finish with a regular three-strand braid or secure it with a hair tie, leaving the rest of your hair loose.
Your Braiding Journey Starts Now
Learning to French braid your own hair is a skill that opens up a world of elegant hairstyles. It might feel awkward at first, a dance between your fingers and your hair, but every attempt is a step closer to mastery. The satisfaction of creating a beautiful braid with your own hands is truly rewarding.
So, grab your brush, find your mirror, and give it a try today. Don’t be discouraged by initial struggles; they are part of the learning process. With patience and practice, you’ll soon be braiding like a pro, effortlessly crafting this timeless look.