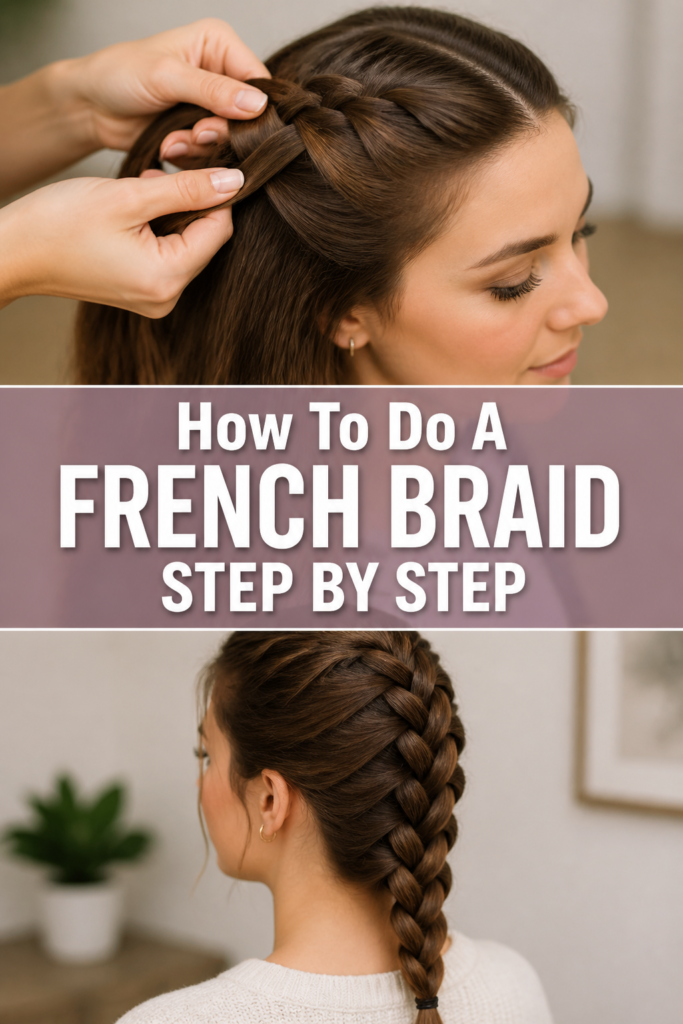
💇 How To Do A French Braid Step By Step
Mastering the French braid is a rite of passage for anyone who loves styling hair.
I remember sitting on my bedroom floor for hours as a teenager, arms aching, until the rhythm finally clicked and the sections felt smooth under my fingers.
This guide comes from years of trial, error, and professional styling to ensure you skip the frustration and get straight to the perfect plait.
Quick Overview
The French braid is a classic three-strand technique that incorporates hair from the sides as you move down the head. It is the foundation for dozens of more complex styles and works for almost any occasion.
- Time needed: 10–15 minutes (once you learn the rhythm)
- Difficulty: Intermediate
- What you’ll need: A hairbrush, a fine-tooth comb, a clear elastic band, and optional texturizing spray.
Step-by-Step Instructions
Step 1: Prep Your Canvas
Brush your hair thoroughly to remove every single knot and tangle. Braiding with tangles is the fastest way to end up with a messy, painful result that you have to pull apart halfway through.
Apply a small amount of dry shampoo or texturizing spray if your hair is very clean or slippery. This gives the strands some “grip” so the braid doesn’t slide out of place while you are working.
Decide on your parting before you begin. Most French braids start from the front hairline, but you can also start further back if you want a more relaxed, bohemian look.
Pro Tip: Second-day hair usually braids much better than freshly washed hair because the natural oils provide a built-in grip.
Step 2: Section the Top
Gather a large section of hair from the very top-center of your head, right at the forehead or crown. This section should be about three to four inches wide, depending on how thick your hair is.
Ensure this section is uniform in thickness from left to right. If one side is heavier, the braid will eventually start to lean or look lopsided as you move down the scalp.
Smooth this initial section with your fingers or a comb to ensure there are no bumps underneath. This is the “anchor” of your entire braid, so it needs to be secure and neat.
Step 3: Create the Three Base Strands
Divide the large section you just gathered into three equal subsections. Hold one in your left hand, one in your right hand, and one between your thumb and index finger of your dominant hand.
Keep your hands close to the scalp. One of the biggest mistakes beginners make is pulling the hair away from the head, which creates a loose, saggy braid that won’t stay put.
Cross the right strand over the center strand. The original right strand now becomes the new center strand.
Cross the left strand over the new center strand. You have now completed one full “stitch” of a regular three-strand braid.
Step 4: Incorporate New Hair from the Right
Hold all three strands in your left hand, keeping them separated with your fingers so they don’t merge. Use your right hand to scoop up a small, new horizontal section of hair from the right side of your head.
Add this new hair to the current right-most strand. Think of it as merging two paths into one larger lane.
Cross this combined, larger right strand over the center strand. Use your middle finger to “catch” the old center strand and move it to the right side.
Pro Tip: Use your pinky finger to “carve” the new sections for a cleaner, more professional look.
Step 5: Incorporate New Hair from the Left
Transfer the strands so your right hand is now holding the tension. Use your left hand to pick up a new section of hair from the left side of your head, near your ear or temple.
Combine this new hair with the left-most strand you are already holding. Make sure the section is roughly the same size as the one you took from the right side.
Cross this combined left strand over the center strand. Tighten the braid slightly by pulling the outer strands outward away from each other.
Step 6: Establish a Consistent Rhythm
Repeat the process of adding hair to the right side and crossing it over. Then, add hair to the left side and cross it over.
Maintain steady tension throughout this process. You want the braid to feel snug against the scalp, but not so tight that it causes discomfort or pulls on your hairline.
Check your progress in a mirror if possible. Ensure you are picking up hair in straight, horizontal rows to keep the sides of the braid looking symmetrical and tidy.
Step 7: Work Down to the Nape
Continue adding hair until you reach the nape of your neck. By the time you get here, all the loose hair from the sides and back of your head should be incorporated into the three main strands.
Ensure the hair at the very bottom of your hairline is tucked in neatly. This area is prone to “bagginess,” so give the strands an extra firm tug as you cross them over at the base of the neck.
Keep your chin tucked down toward your chest while braiding the nape. This prevents the braid from becoming loose when you eventually stand up straight and look forward.
Pro Tip: If you have layers, use a tiny bit of hair wax on your fingertips during this stage to keep the ends from poking out.
Step 8: Finish with a Traditional Braid
Braid the remaining length of your hair using a standard three-strand technique. Since there is no more hair to add from the scalp, you are simply finishing the “tail.”
Bring the hair over your shoulder to the front if your arms are getting tired. This makes it much easier to see what you are doing and finish the ends neatly.
Stop braiding when you have about an inch or two of hair left at the bottom. Leaving a little bit of a “tail” prevents the elastic from slipping off the very ends.
Step 9: Secure and Polish
Wrap a clear or hair-colored elastic band around the end of the braid. Make sure it is tight enough that it won’t slide down throughout the day.
Gently pull at the edges of the braid loops starting from the top and working your way down. This technique, called “pancaking,” makes the braid look much thicker and more voluminous.
Mist the finished style with a light-hold hairspray. This will tame any flyaways and keep the sections looking crisp for hours.
Common Mistakes to Avoid
Grabbing Uneven Sections
When you pick up more hair on one side than the other, the braid will naturally begin to slant. This creates a lopsided look that is very difficult to fix without starting over. Always try to mirror the amount of hair you take from the left and right sides to keep the braid centered down your spine.
Losing Tension in the Middle
Many people start strong but lose their grip as their arms get tired halfway down the head. This results in a “bubble” of loose hair near the middle of the back of the head. To avoid this, make sure you are pulling the strands firmly after every single crossover to keep the braid flush against the scalp.
Starting Too Far Back
If you don’t start the braid close enough to the forehead, the front sections of your hair will be too long and floppy. They will eventually fall out of the braid and hang in your face. Start with a small section right at the hairline to ensure every strand is secured from the very beginning.
Troubleshooting
Bumps Underneath the Braid
Bumps usually happen when the hair you are adding hasn’t been smoothed out before it is crossed over. If you feel a lump forming, use a fine-tooth comb to gently brush the new section of hair into the strand before you make the move. If the bump is already braided in, you can sometimes use a bobby pin to tuck it under the braid and hide it.
Hand and Arm Fatigue
It is completely normal for your shoulders to burn when you are first learning this style. If you need a break, hold all three strands in one hand and press that hand firmly against the back of your head to maintain tension while you shake out the other arm. You can also lean your head back against a wall or high-backed chair to take some of the weight off your arms.
Tangled Ends While Braiding
As you cross the top strands, the bottom ends of your hair will often try to braid themselves in reverse. Every few stitches, run your fingers all the way through the ends of the three strands to “clear” them. This prevents a giant knot from forming at the bottom while you are working on the top.
Key Takeaways
- Preparation is vital: Always start with completely detangled hair and use a texturizing product if your hair is too silky.
- Finger placement matters: Keep your hands as close to the scalp as possible to ensure a tight, professional-looking finish.
- Maintain symmetry: Use your ears and the center of your neck as landmarks to ensure you are picking up equal amounts of hair on both sides.
- Tension is your friend: A braid that is too tight can be loosened later, but a braid that is too loose can rarely be fixed without redoing it.
- Practice makes perfect: Don’t be discouraged if your first few attempts look messy; your muscle memory will improve every time you try.
Frequently Asked Questions
Can I French braid my own hair if it is short?
Yes, you can French braid hair that is as short as chin-length. The key is to take much smaller sections and use a bit of styling gel or pomade to keep the shorter layers from popping out of the braid. For very short hair, doing two “pigtail” French braids is often easier than trying to fit all the hair into one center braid.
Is it better to French braid hair when it is wet or dry?
Braiding wet hair is easier because the hair is more manageable and there are fewer flyaways. However, hair is most fragile when it is wet, so you must be careful not to pull too hard. If you braid it wet and let it dry, you will end up with very tight, crimped waves when you take the braid out.
How do I stop the braid from sagging at the nape of my neck?
The “nape sag” happens when you don’t pull the last few sections of hair tight enough. To prevent this, tilt your head down toward your chest as you incorporate the final sections of hair from the bottom of your hairline. This stretches the skin and hair at the back of the neck, so when you look up, the braid naturally tightens against your head.
What is the difference between a French braid and a Dutch braid?
The only difference is the direction of the crossover. In a French braid, you cross the strands over the center strand. In a Dutch braid, you cross the strands under the center strand. This makes the Dutch braid sit on top of the hair like a 3D “inside-out” braid, while the French braid looks more integrated and flat.
Our Top Recommended Finds
- Clear Elastic Hair Ties: These are essential for a seamless finish that doesn’t distract from the braid itself.
- Boar Bristle Teasing Brush: Perfect for smoothing out the initial sections and ensuring there are no bumps at the crown.
- Lightweight Hair Oil: A tiny drop applied to your fingertips before you start can prevent frizz and add a healthy shine to the finished look.
Level Up Your Styling Game Today
Now that you have the foundation of the French braid down, you can start experimenting with different variations.
Try creating two side braids for a sporty look, or wrap the tail of your braid into a low bun for a sophisticated evening style.
The best way to get better is to practice while watching a movie or sitting through a long phone call. Put your hair up today and see how much easier it gets with every stitch!