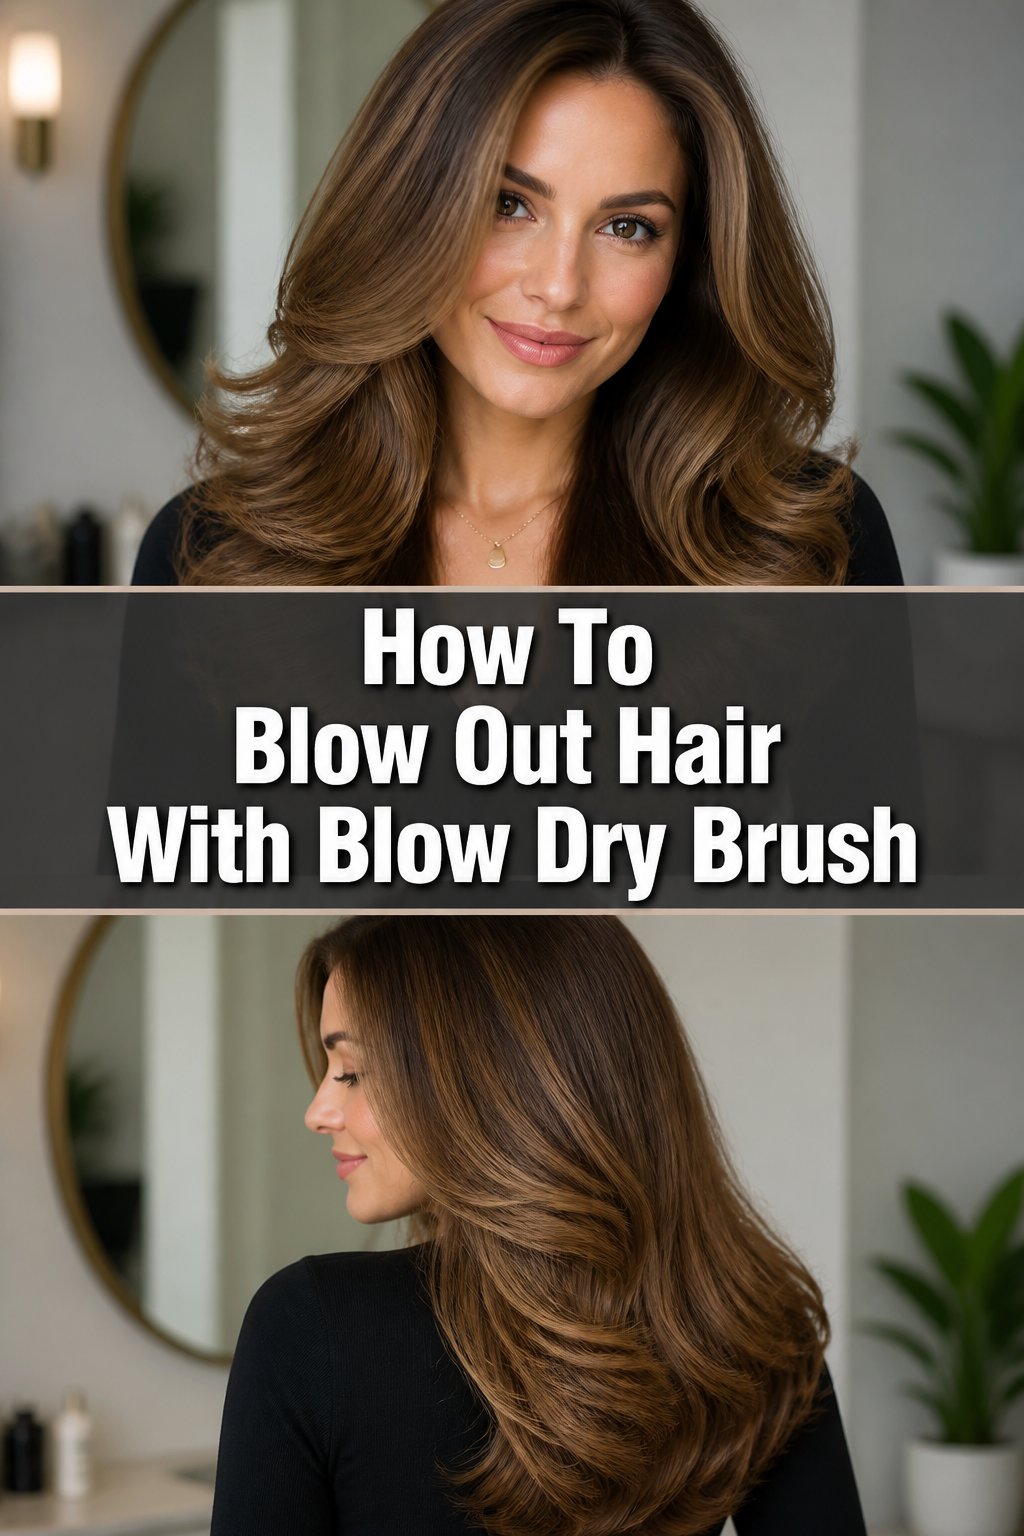
🌬️ How To Blow Out Hair With Blow Dry Brush
Achieving a salon-quality blowout at home used to feel like a secret only professional stylists knew.
Wrestling with a round brush and a traditional hairdryer often ended in arm fatigue, tangles, and less-than-perfect results.
But with the rise of the blow dry brush, transforming your hair has become incredibly simple and efficient, a technique I’ve personally mastered for quick, beautiful hair days.

Quick Overview
This guide will walk you through creating a smooth, voluminous, and shiny blowout using a blow dry brush. You’ll learn how to prepare your hair, section it correctly, and master the brush technique for stunning results.
- Time needed: 20-40 minutes (depending on hair length and thickness)
- Difficulty: Beginner
- What you’ll need: Blow dry brush, heat protectant, hair clips/sectioning clips, detangling brush, styling products (optional)
Step-by-Step Instructions
Step 1: Prepare Your Hair
Start with freshly washed, towel-dried hair. Your hair should be damp, not dripping wet. Aim for about 60-70% dry to minimize heat exposure and speed up the process.
Gently squeeze excess water from your hair using a microfiber towel. This helps reduce frizz and is much kinder to your strands than vigorous rubbing.
Detangle your hair thoroughly. Use a wide-tooth comb or a dedicated detangling brush, working from the ends upwards. This prevents knots and ensures the blow dry brush glides smoothly.
Step 2: Apply Heat Protectant
Protect your hair from heat damage. Apply a generous amount of heat protectant spray or cream evenly throughout your damp hair.
Distribute the product by combing it through your hair from roots to ends. Heat protectant is non-negotiable for maintaining hair health and shine when using heat tools.
Pro Tip: Different heat protectants offer various benefits. Some add shine, others provide hold or extra frizz control. Choose one that aligns with your hair type and desired outcome.
Step 3: Section Your Hair
Divide your hair into manageable sections. This is crucial for achieving an even, thorough blowout and preventing tangles.
Use hair clips to separate your hair. Start by creating a horizontal part from ear to ear, clipping up the top half. Then, divide the bottom half into two or three smaller sections.
Work your way up the head. Smaller sections are easier to dry and style, ensuring each strand gets adequate attention from the blow dry brush.
Step 4: Begin Drying the Underneath Sections
Turn on your blow dry brush to a medium heat setting. Always start with a lower setting to gauge how your hair responds and prevent overheating.
Take a small section of hair from the very bottom. Place the blow dry brush underneath the section, close to the roots.
Pull the brush slowly downwards, rotating it slightly to create tension. Follow the brush with your hair, guiding it through the bristles to smooth and dry.
Repeat this motion several times on the same section until it is completely dry and smooth. For added volume, lift the brush upwards at the roots as you pull.
Step 5: Work Your Way Up
Continue drying section by section, moving upwards from the nape of your neck towards the crown of your head.
Unclip the next section of hair and repeat the same process. Ensure each section is fully dry before moving on to the next.
Focus on the roots first for volume. Hold the brush at the roots for a few seconds, gently lifting, before slowly gliding it down the length of the hair.
Pro Tip: For extra bounce and curl, wrap the ends of your hair around the brush and hold for a few seconds before releasing. You can also switch to a cool shot setting at the end of each section to set the style.
Step 6: Style the Top and Front Sections
Pay extra attention to the top and front sections of your hair, as these are most visible.
For volume at the crown, take sections straight up from the top of your head. Place the brush underneath the roots and pull upwards and backwards.
Frame your face by styling the front sections. Pull them forward and slightly upwards, guiding the brush to create a soft bend or flip away from your face.
Experiment with different angles and directions to achieve your desired look. The blow dry brush offers great versatility for various styles.
Step 7: Smooth and Refine
Once all sections are dry, do a final pass over your entire head. Look for any damp spots or areas that need extra smoothing.
Use the cool shot setting on your blow dry brush. This helps to seal the hair cuticle, lock in shine, and set your style for longer-lasting results.
Run the cool brush through your hair from roots to ends. This step is essential for reducing frizz and adding a glossy finish.
Step 8: Finish Your Look
Apply a small amount of finishing product. A lightweight hair oil can add shine and tame any flyaways.
Alternatively, a flexible hold hairspray can help maintain your volume and style without making your hair stiff.
Gently run your fingers through your hair to loosen the style and create a more natural look. Avoid brushing too much, as this can break up the volume you’ve just created.
Common Mistakes to Avoid
Using on Soaking Wet Hair
Many people try to use their blow dry brush on hair that is too wet. This significantly prolongs drying time and exposes your hair to unnecessary, prolonged heat, which can lead to damage and frizz. Always pre-dry your hair to at least 60-70% damp before starting.
Not Sectioning Properly
Skipping the sectioning step makes the blow dry process overwhelming and ineffective. You’ll struggle to reach all areas, leading to uneven drying, missed spots, and a less polished finish. Taking the time to clip your hair into manageable sections ensures every strand gets attention.
Using Too High Heat
Blasting your hair with the highest heat setting might seem faster, but it’s a direct route to heat damage, dryness, and breakage. Always start with a medium heat setting and only increase if necessary for stubborn areas. The cool shot is for setting, not for initial drying.
Holding the Brush Still
Leaving the blow dry brush stationary on one section for too long concentrates heat in one spot, risking burns or damage. Keep the brush moving steadily from roots to ends, maintaining tension and ensuring even heat distribution for smooth, healthy results.
Troubleshooting
Hair Still Frizzy After Drying
If your hair feels frizzy, you might not be drying each section completely or you’re not using enough tension. Ensure each section is 100% dry before moving on, and actively pull the brush through your hair to smooth the cuticle. Using a cool shot at the end of each section is also vital for sealing in smoothness.
Lack of Volume
For more volume, focus on lifting at the roots. When drying, place the brush underneath the section close to the scalp and lift upwards, holding it there for a few seconds before pulling down. You can also overdirect sections (pulling hair in the opposite direction from its natural fall) for extra lift at the crown.
Hair Getting Tangled in the Brush
Tangles usually happen if your hair isn’t thoroughly detangled beforehand, or if you’re taking sections that are too large. Always start with detangled hair and work with small, manageable sections. If a tangle occurs, gently rotate the brush to release it, don’t yank.
Key Takeaways
- Always start with 60-70% damp, detangled hair to protect from heat.
- Heat protectant is a crucial first step for healthy hair.
- Sectioning your hair makes the blowout process much more efficient and effective.
- Work with small sections, moving the brush slowly and steadily from roots to ends.
- Use the cool shot setting to set your style, add shine, and reduce frizz.
- Finish with a lightweight product for extra polish and hold.
Frequently Asked Questions
Can I use a blow dry brush every day?
While convenient, daily use of any heat tool can eventually lead to damage. It’s best to limit use to a few times a week. On off days, try dry shampoo to refresh your style or opt for heatless styling methods to give your hair a break.
What’s the difference between a blow dry brush and a regular round brush and hairdryer?
A blow dry brush combines the functions of a hairdryer and a round brush into one tool. This simplifies the process, making it easier for beginners to achieve a smooth blowout without needing two hands or advanced coordination. It’s an all-in-one solution for efficiency.
How do I clean my blow dry brush?
Regular cleaning is important for hygiene and performance. First, unplug the device and let it cool. Use a fine-tooth comb or your fingers to remove any trapped hair from the bristles. Then, gently wipe down the barrel and handle with a damp cloth. Avoid submerging it in water.
Will a blow dry brush work on short hair?
Absolutely! Blow dry brushes come in various barrel sizes. For shorter hair, look for a brush with a smaller barrel diameter. This allows for better grip and control over shorter strands, making it easier to add volume and shape.
Our Top Recommended Finds
- Microfiber Hair Towel: Quickly absorbs excess water, reducing drying time and minimizing frizz before you even start styling.
- Quality Heat Protectant Spray: Essential for shielding your hair from heat damage, ensuring your strands stay healthy and shiny despite regular styling.
- Sectioning Clips: Indispensable for dividing hair into manageable parts, making the blow dry process organized and efficient.
Embrace Your New Styling Routine
Mastering the blow dry brush is a game-changer for your hair routine. You now have the power to create beautiful, voluminous blowouts right in your own home, saving time and money.
With practice, you’ll find your rhythm and perfect the technique for your unique hair type. Don’t be afraid to experiment with different sectioning and brushing methods to discover what works best for you.
Take these steps and transform your hair today. Your best hair days are just a few brush strokes away.