💁♀️ How To Make A Messy Bun With Long Hair
For years, I chased the elusive messy bun, often ending up with a lopsided knot or a bun that felt anything but effortless.
It’s a style that seems simple, yet mastering it requires a few clever tricks, especially when you have long hair.
This guide comes from countless attempts and eventual success, designed to help you create that perfectly imperfect look with ease.
Quick Overview
You’re about to learn the secrets to achieving a stylish, comfortable messy bun that holds all day. This guide breaks down the process into simple, repeatable steps.
You’ll discover how to add texture, secure your bun effectively, and create that desired “messy” finish without it looking undone.
- Time needed: 5-10 minutes
- Difficulty: Beginner
- What you’ll need: Hair tie(s), bobby pins, texturizing spray (optional), dry shampoo (optional)
Step-by-Step Instructions
Step 1: Prepare Your Canvas
Start with hair that has a little grit. Day-old hair is often ideal for messy buns as it provides better grip than freshly washed, silky strands.
If your hair is too clean, spray a generous amount of dry shampoo or texturizing spray throughout your roots and mid-lengths. This adds volume and a foundational texture.
Pro Tip: Flipping your head upside down while applying dry shampoo can help distribute the product evenly and build extra volume at the crown.
Step 2: Choose Your Bun Placement
Decide where you want your bun to sit. A higher bun on the crown offers a playful, energetic look, while a lower bun near the nape of your neck appears more relaxed and sophisticated.
A mid-level bun, positioned just below the crown, is a versatile choice that suits most occasions and face shapes.
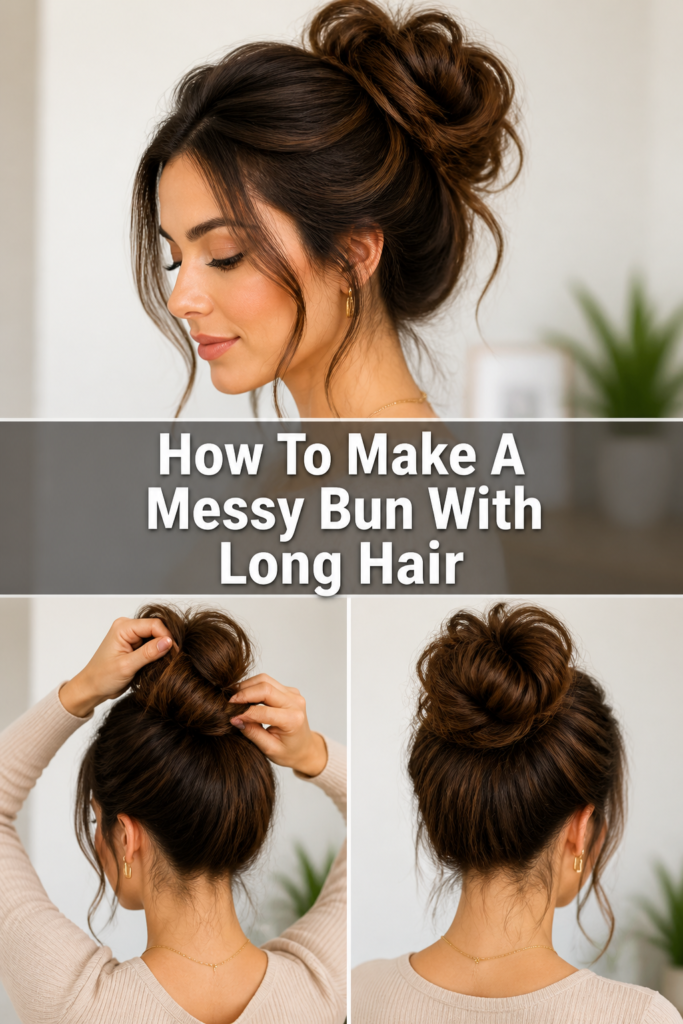
Step 3: Gather Your Hair Loosely
Using your fingers, not a brush, gently gather all your hair into a ponytail at your chosen placement. The key here is not to pull it too tightly or make it too neat.
Allow for some natural bumps and loose strands around your hairline. This immediately contributes to the “messy” aesthetic.
Step 4: Create the Initial Loop
Hold your hair in one hand as if you’re about to secure a ponytail. With your other hand, take your hair tie.
Wrap the tie around your gathered hair once, then on the second pass, pull your hair only halfway through, creating a large loop.
Step 5: Twist and Wrap the Remaining Tail
You’ll now have a loop of hair and a remaining tail. Take the tail of your hair and gently twist it.
Wrap this twisted tail loosely around the base of the loop you just created. Don’t worry about perfection; a loose wrap is exactly what you want.
Pro Tip: The direction you twist your hair can affect the final look. Experiment with twisting clockwise or counter-clockwise to see which you prefer.
Step 6: Secure the Bun
Once the tail is wrapped around the base, take your hair tie and wrap it over the entire bun you’ve formed. This secures both the loop and the wrapped tail in place.
You might need to wrap it twice depending on the thickness of your hair and the elasticity of your tie. Ensure it feels secure but not uncomfortably tight.
Step 7: “Mess It Up” Strategically
Now comes the fun part: making it messy! Gently tug on sections of the bun itself to loosen it and create more volume and an undone texture.
Pull out a few small strands around your face, temples, and neck. These wispy pieces soften the look and enhance the casual vibe.
Step 8: Pin for Perfection (or Imperfection)
Inspect your bun for any areas that feel too loose or are visibly falling out. Use bobby pins to discreetly secure these sections.
Insert the bobby pins from the outside of the bun, pushing them inwards towards the scalp to anchor them firmly.
Pro Tip: For extra hold, spray your bobby pins with hairspray before inserting them. This provides a better grip on the hair.
Step 9: Final Touches and Hold
Take a moment to look at your bun from all angles. Adjust any pieces that feel out of place, or pull more strands out if you want a softer effect.
Finish with a light mist of flexible-hold hairspray to keep everything in place without making it stiff. Your perfect messy bun is complete!
Common Mistakes to Avoid
Making It Too Neat
The biggest pitfall when aiming for a messy bun is trying to make it perfect. If you brush your hair too smooth or pull your ponytail too tight, you’ll end up with a sleek bun, not a messy one.
Embrace the imperfections. Use your fingers to gather your hair and allow those natural bumps and flyaways to contribute to the look.
Over-Tightening the Hair Tie
Wrapping your hair tie too many times or pulling it excessively tight can result in a flat, uncomfortable bun that lacks volume and bounce. It also puts undue stress on your hair.
Aim for a secure but slightly loose initial hold. You want enough tension to keep the bun in place, but not so much that it feels restricted or causes a headache.
Forgetting Texture Prep
Trying to create a messy bun on freshly washed, super-silky hair is often a recipe for frustration. Such hair tends to slip out of place and refuses to hold volume.
Always add some form of texture. Dry shampoo or texturizing spray are your best friends here, providing the necessary grip and body for a lasting, effortless bun.
Using the Wrong Tools
Flimsy hair ties that snap easily or bobby pins that are too short for your hair thickness can sabotage your efforts. Poor-quality tools lead to a bun that quickly falls apart.
Invest in good quality, strong hair ties that don’t snag your hair and a variety of bobby pin sizes. Larger, wavy bobby pins often provide better hold for long, thick hair.
Troubleshooting
My Bun Keeps Falling Out
This is a common issue, especially with long, heavy hair. The problem often lies in insufficient initial grip or a lack of proper pinning.
Ensure your hair has enough texture before you begin. Use a good texturizing spray. When securing with bobby pins, make sure you’re catching strands from the bun and anchoring them firmly against your scalp. Criss-cross pins for extra hold.
The Bun Looks Too Small or Flat
A flat bun can happen if your hair lacks volume or if you’re pulling it too tightly. The “messy” aspect requires some fullness.
Before creating the bun, tease your ponytail slightly, especially at the base. Once the bun is formed, gently tug on sections of the bun itself to expand its size and create a fuller, more voluminous shape.
My Bun Looks Lopsided
A lopsided bun usually stems from an uneven starting point. When you gather your hair, your head might be tilted, or your hands might not be centered.
Gather your hair in front of a mirror, making sure your head is straight. Feel for the center point at your chosen bun placement. If it still looks a little off, gently push the bun to one side or use extra pins to adjust its shape until it feels balanced.
Key Takeaways
- Texture is paramount; always start with day-old hair or add dry shampoo/texturizing spray.
- Don’t strive for perfection; embrace natural bumps and loose strands for an authentic messy look.
- Use your fingers, not a brush, when gathering your hair to maintain a relaxed feel.
- The “half-pull” method with your hair tie creates the ideal foundation for wrapping.
- Strategically pull out face-framing pieces and gently tug at the bun to enhance its effortless appearance.
- Bobby pins are essential for securing loose sections and customizing the shape and hold.
Frequently Asked Questions
Can I make a messy bun with freshly washed hair?
While day-old hair is preferred, you absolutely can make a messy bun with clean hair. The trick is to add texture. Generously apply dry shampoo or texturizing spray from roots to ends to give your hair the necessary grip and grit.
What if my hair is very layered?
Long layers can actually enhance the messy bun look, as the shorter pieces will naturally fall out and frame your face. For layers that are too short to reach the bun, you can either embrace them as wispy pieces or use a few extra bobby pins to tuck them in if you prefer a neater messy look.
How can I make my messy bun last all day?
The key to longevity is proper preparation and securing. Start with good texture, ensure your hair tie is snug but not tight, and don’t shy away from using bobby pins. Finish with a strong-hold hairspray, focusing on the bun itself and any loose strands.
Can a messy bun look professional?
Yes, it can! For a professional setting, opt for a mid-to-low bun placement. Keep the front sections a bit neater, perhaps tucking in most face-framing pieces, and ensure the bun itself is secure and well-shaped, even if it has a relaxed texture. It’s about controlled messiness.
Our Top Recommended Finds
- Good Quality Hair Ties: Look for seamless, snag-free elastic ties. They prevent damage and provide a strong hold without pulling.
- Texturizing Spray: A lightweight texturizing spray adds grit, volume, and hold, making your hair easier to style and helping the bun last longer.
- Bobby Pin Assortment: Having a mix of sizes and colors (to match your hair) is invaluable. Long, wavy pins are especially effective for thick or long hair.
Embrace Your Effortless Style
Creating a messy bun is less about precision and more about confidence and a few smart techniques. It’s a versatile style that embodies ease and chicness.
Don’t be afraid to experiment with placement, tightness, and how much you “mess” it up. Your perfect messy bun is unique to you and your hair.
Take these steps, try them out today, and enjoy the freedom of a perfectly imperfect hairstyle. You’ll be rocking that effortless look in no time.