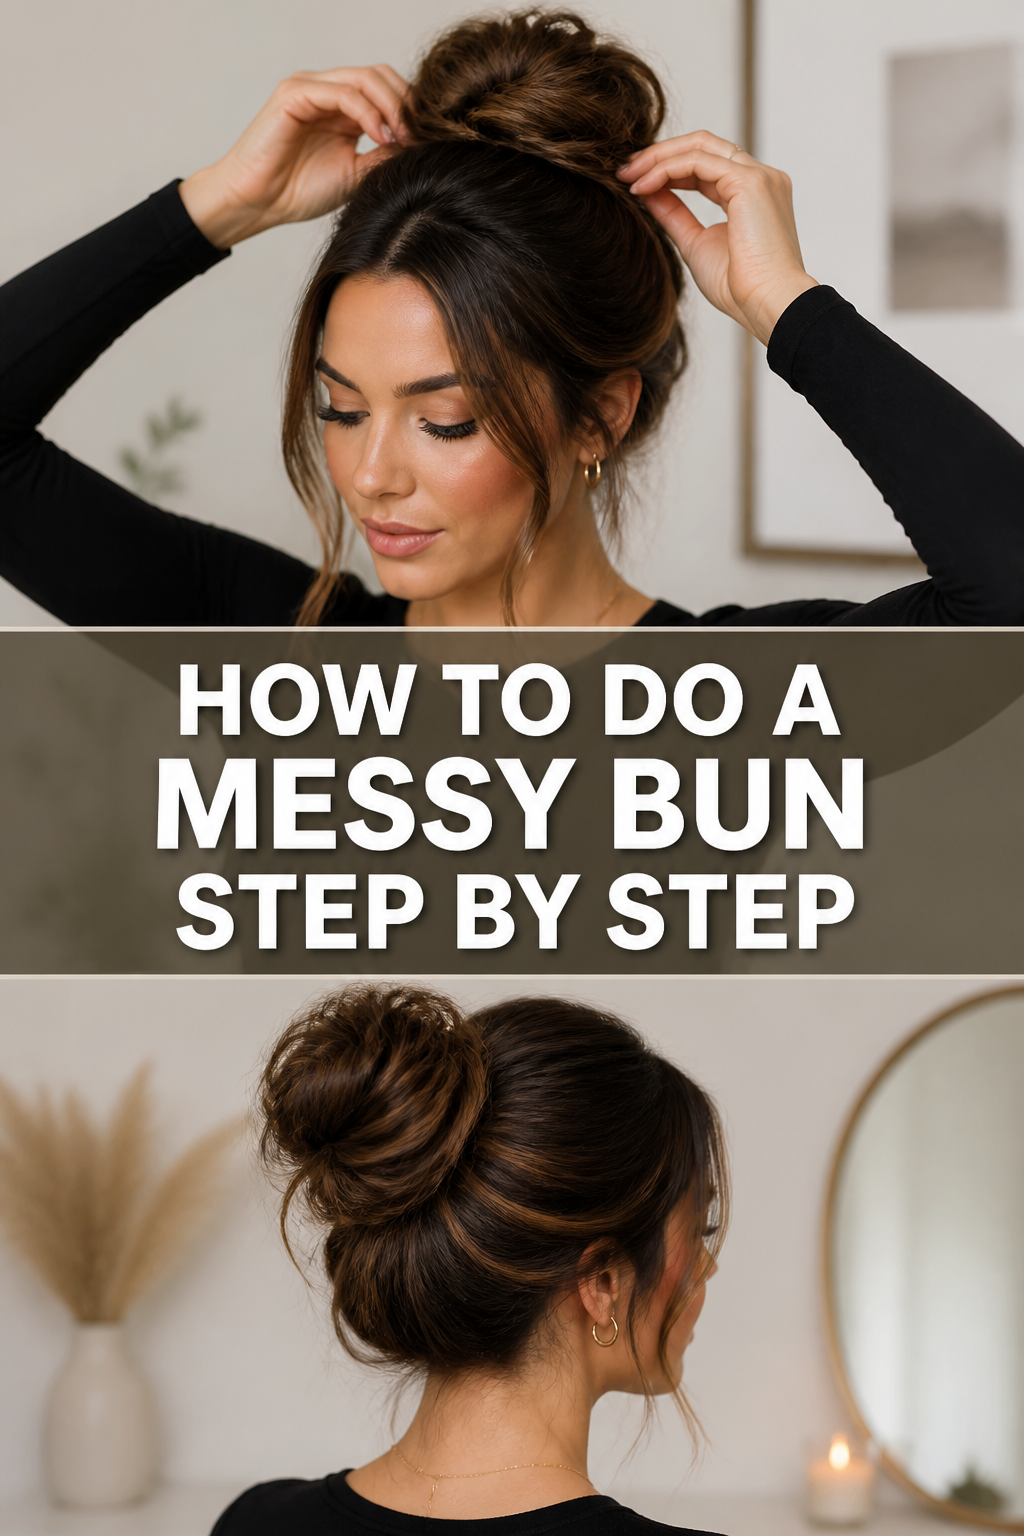
✨ How To Do A Messy Bun Step By Step
I remember countless mornings staring in the mirror, attempting to master the elusive messy bun. It seemed so effortless on others, yet my attempts often looked more “just rolled out of bed” than “effortlessly chic.” After much practice and many failed attempts, I finally cracked the code to a perfectly imperfect messy bun.
This guide shares all my secrets, ensuring your messy bun journey is much smoother than mine was. You’ll soon be creating beautiful, casual styles with confidence and ease.

Quick Overview
Creating a fabulous messy bun is all about understanding the technique and embracing a little imperfection. You’ll learn how to build volume, secure your bun, and strategically pull out pieces for that coveted lived-in look.
- Time needed: 5-10 minutes
- Difficulty: Beginner
- What you’ll need: Hair tie, bobby pins, texturizing spray (optional), light-hold hairspray (optional)
Step-by-Step Instructions
Step 1: Prepare Your Hair
Start with hair that isn’t freshly washed. Second or third-day hair often holds style better and has more natural texture. If your hair is too clean, it might be too slippery.
Apply a dry shampoo or texturizing spray to your roots and mid-lengths. This adds grip and volume, which are crucial for a lasting messy bun. Gently massage it in with your fingertips.
Flip your head upside down and give your hair a quick shake. This helps to loosen up the roots and build natural volume before you even begin styling.
Step 2: Decide on Your Bun’s Placement
Determine where you want your bun to sit. A high bun offers a playful, energetic look, while a mid-level bun is classic and versatile. A low bun can feel more elegant or relaxed.
Consider your face shape and personal preference. Experiment in front of a mirror to see what placement flatters you most. There’s no single “right” spot.
Pro Tip: For a more casual, everyday look, aim for a mid-to-high placement, right at the crown of your head or slightly below. This is generally the most forgiving and universally flattering spot.
Step 3: Gather Your Hair into a Ponytail
Gather all your hair as if you’re making a regular ponytail at your chosen height. Use your fingers to comb through, avoiding a brush for a softer, less polished base.
Tilt your head slightly back as you gather your hair. This helps to create tension at the nape of your neck and prevents saggy spots, especially for higher buns.
Hold the gathered hair firmly with one hand. Don’t worry about every strand being perfectly smooth; remember, “messy” is part of the charm.
Step 4: Create the First Loop
Take your hair tie in your free hand. Begin to wrap it around your gathered hair as you would for a standard ponytail.
Loop the hair tie around once, securing the base of your ponytail. This creates a stable foundation for your bun.
Pull your hair through the loop only partially on the second wrap. You want to create a small, loose loop of hair, leaving the ends sticking out. This is the crucial first step to forming the bun shape.
Step 5: Twist and Wrap the Remaining Ends
Take the ends of the hair that are sticking out from your partial loop. Gently twist them together a couple of times. This helps to consolidate the hair and give it some structure.
Wrap these twisted ends around the base of the partial loop you just created. You are essentially forming the outer layer of your bun with these ends. Wrap them either clockwise or counter-clockwise, whichever feels more natural.
Tuck the very tips of the ends under the bun or into the hair tie itself. This helps to secure them and keep them from dangling.
Step 6: Secure with the Hair Tie
Take your hair tie and wrap it over the entire bun you’ve just formed. This usually requires a third or fourth wrap, depending on the thickness of your hair.
Ensure the hair tie feels snug but not painfully tight. It needs to hold the bun in place without making it look squashed or flat. Adjust the tension as needed.
Check that the bun feels secure. Give it a gentle tug to test its stability. If it feels wobbly, you might need another wrap or some extra pins.
Step 7: “Messy” It Up
Gently tug on small sections of hair around the bun itself. Pull out tiny loops or strands to create texture and a more undone look. Be subtle; a little goes a long way.
Pull out a few face-framing pieces around your temples and ears. This softens the look and adds to the effortless vibe. Don’t overdo it, though.
Use your fingertips to gently loosen the hair at your crown. This adds volume and prevents the top of your head from looking too flat or severe.
Step 8: Pin and Perfect
Identify any loose strands or sections that feel like they might fall out. Use bobby pins to discreetly secure them. Insert the bobby pins horizontally or vertically into the bun, aiming for the base.
Cross two bobby pins over each other for extra hold in stubborn areas. This creates an “X” shape that is surprisingly secure.
Mist your entire style with a light-hold hairspray. This will help to keep flyaways in check and ensure your messy bun lasts throughout the day without looking stiff.
Common Mistakes to Avoid
Making It Too Perfect
The biggest mistake is trying too hard to make your messy bun look neat and tidy. The whole point of a messy bun is its relaxed, undone charm. If you brush your hair too much or try to smooth every bump, you’ll end up with a stiff, formal bun that misses the mark entirely. Embrace the imperfections and let some strands fall naturally.
Using a Hair Tie That’s Too Loose or Too Tight
A hair tie that’s too loose won’t hold your bun, leading to it falling out quickly. Conversely, a tie that’s too tight will make your bun look small, flat, and uncomfortable. It can also cause tension headaches. Find a balance where the bun feels secure but still has a natural, voluminous shape.
Forgetting to Add Texture
Clean, smooth hair can be very difficult to style into a messy bun that holds. It often slips and lacks the necessary grip. Skipping dry shampoo or texturizing spray on freshly washed hair is a common oversight. Without added texture, your bun might look flat or simply unravel.
Pulling Out Too Many Strands
While pulling out face-framing pieces and loosening the bun is essential for the “messy” effect, going overboard can make your hair look disheveled rather than stylishly undone. If you pull out too many pieces, the bun might lose its structure and appear messy in a bad way. Exercise restraint and aim for subtle, strategic loosening.
Troubleshooting
My Bun Keeps Falling Out
This is usually a sign that your hair lacks sufficient grip or your hair tie isn’t secure enough. Try adding more texturizing spray or dry shampoo to your hair before you start. Also, ensure you’re wrapping the hair tie tightly enough around the base of the bun. Don’t be afraid to use extra bobby pins, crossing them over each other for a stronger hold.
My Bun Looks Flat and Lifeless
A flat bun often means you haven’t built enough volume or you’ve pulled the hair tie too tight. Before forming the bun, gently backcomb the roots of your ponytail for added lift. You can also lightly tease the hair within the partial loop before wrapping the ends. After securing, gently tug at the bun itself to expand its shape and create more fullness.
I Can’t Get the “Messy” Part Right
Achieving the perfect “messy” look is an art. If your bun looks too neat, try pulling out thicker pieces of hair, especially around the crown and the perimeter of the bun. If it looks too disheveled, you might be pulling out too many strands or not securing the base enough. Focus on creating an initial secure bun, then strategically loosen small sections around it. Sometimes, simply flipping your head over and gathering your hair creates enough natural messiness.
Key Takeaways
- Start with textured hair: Second-day hair or hair with dry shampoo/texturizing spray holds better.
- Choose your placement: Decide if you want a high, mid, or low bun for the desired vibe.
- Partial loop is key: The initial partial pull-through creates the core structure of your messy bun.
- Twist and wrap: Gently twisting the ends before wrapping adds volume and shape.
- Secure, then loosen: Ensure the bun is firmly held by the hair tie and pins before strategically pulling out pieces.
- Embrace imperfection: The charm of a messy bun lies in its effortless, slightly undone appearance.
Frequently Asked Questions
Can I do a messy bun with short hair?
Yes, absolutely! While it might be a smaller bun, you can definitely create a messy bun with shorter hair, like a bob or a lob. Focus on gathering all your hair at the nape of your neck for a low bun, or use more bobby pins to secure shorter layers around a high bun. Texturizing spray is even more crucial for shorter lengths to provide grip.
How do I make my messy bun last all day?
To maximize hold, start with textured hair using dry shampoo or texturizing spray. Ensure your hair tie is snug but comfortable, and don’t hesitate to use several bobby pins to secure any loose sections. Finish with a generous mist of flexible-hold hairspray, paying attention to flyaways around your face and the nape of your neck.
What if my hair is very fine or very thick?
For fine hair, focus on building volume with dry shampoo, backcombing the ponytail before forming the bun, and gently tugging the bun outwards to create the illusion of fullness. For very thick hair, you might need a stronger hair tie or even two. You can also divide your hair into two sections (top and bottom) and create two smaller buns that blend together for easier management and a less bulky look.
Should I use a brush or my fingers to gather my hair?
Using your fingers is generally preferred for a messy bun. A brush tends to make the hair too smooth and perfect, which goes against the messy aesthetic. Your fingers help to create natural texture and slight bumps, contributing to the effortless look. Save the brush for more formal updos.
Our Top Recommended Finds
- Texturizing Spray: A good texturizing spray adds grit and volume, making hair easier to style and hold.
- Strong, Snag-Free Hair Ties: Invest in hair ties that provide a firm grip without pulling or damaging your hair.
- Bobby Pins (in your hair color): Essential for securing stray pieces and adding extra hold where needed, blending seamlessly with your hair.
Your Go-To Style Awaits
Now that you have all the tools and techniques, it’s time to put them into practice. The messy bun is more than just a hairstyle; it’s a statement of effortless confidence. It’s perfect for a busy day, a casual outing, or even dressing down a more formal outfit.
Don’t be discouraged if your first few attempts aren’t exactly what you envisioned. Practice makes perfect, or in this case, perfectly imperfect. Keep experimenting with placement, tightness, and how much you “mess” it up. Soon, you’ll be creating stunning, casual buns in minutes. Try it out tomorrow morning – your hair will thank you!