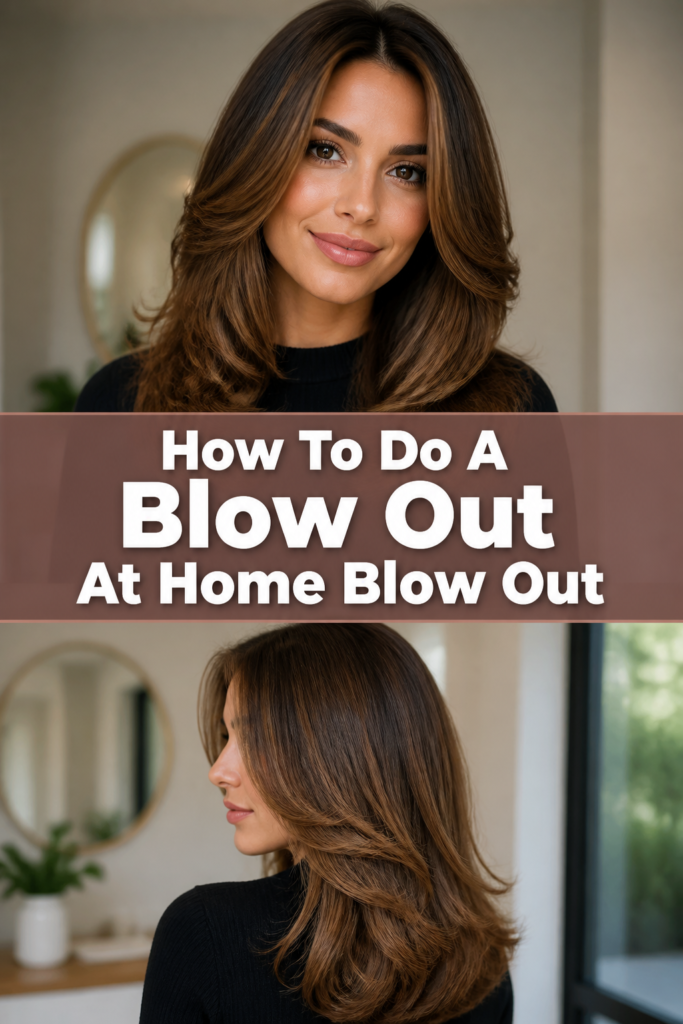
🌬️ How To Do A Blow Out At Home Blow Out
For years, I admired those effortlessly bouncy, salon-perfect blowouts, convinced they were an unattainable luxury. I remember my own early attempts, resulting in either a frizzy mess or flat, lifeless strands.
After countless hours of practice, product experiments, and a few minor arm cramps, I finally cracked the code to achieving that coveted look right in my own bathroom. This guide shares all my practical tips and techniques, so you can transform your hair with confidence.
Quick Overview
Getting a salon-quality blowout at home is absolutely achievable with the right tools and a little patience. You’ll create smooth, voluminous, and long-lasting style that looks professionally done.
- Time needed: 60-90 minutes (depending on hair length and density)
- Difficulty: Intermediate (requires practice, but highly rewarding)
- What you’ll need: Hairdryer, round brush(es), sectioning clips, heat protectant, styling products, fine-tooth comb
Step-by-Step Instructions
Step 1: Prepare Your Hair Properly
The foundation of a great blowout begins in the shower. Wash your hair thoroughly with a clarifying shampoo if you have product buildup. Follow with a nourishing conditioner, focusing on the ends.
Rinse completely to ensure no residue is left behind. Excess product can weigh your hair down and make it look greasy. Gently squeeze out excess water before stepping out.
Step 2: Towel Dry and Detangle
Wrap your hair in a microfibre towel or a soft cotton t-shirt. This helps absorb moisture without causing frizz. Avoid rubbing your hair vigorously, as this can rough up the cuticle.
Gently blot and squeeze your hair until it’s about 60-70% dry. Use a wide-tooth comb to carefully detangle your hair, starting from the ends and working your way up.
Pro Tip: Using a microfibre towel significantly reduces drying time and minimizes frizz, making your blowout smoother.
Step 3: Apply Your Styling Products
Section your damp hair into a few large parts for even product distribution. Dispense a dime-sized amount of heat protectant into your palm. Work it evenly through your hair, focusing on the mid-lengths and ends.
Follow with a volumizing mousse or root lift spray, applying it primarily to the roots for maximum lift. If your hair is prone to frizz, a small amount of smoothing serum can be applied to the ends.
Step 4: Rough Dry Your Hair
Attach the nozzle concentrator to your hairdryer. This is crucial for directing airflow and preventing frizz. Begin to rough dry your hair until it’s about 80% dry.
Use your fingers to lift and tousle your roots as you dry. This helps to build initial volume. Avoid using a brush during this stage, as your hair is still quite wet and susceptible to damage.
Step 5: Section Your Hair for Control
Create clean, manageable sections using a fine-tooth comb and hair clips. Start by making a horizontal part from ear to ear, clipping up the top half of your hair.
Divide the bottom section into two or three smaller, vertical sections. As you work your way up, you’ll create smaller, more precise sections. Smaller sections are easier to control and style effectively.
Pro Tip: The smaller your sections, the more control you’ll have, leading to a smoother, more polished finish. Aim for sections no wider than your brush.
Step 6: Master the Round Brush Technique
Begin with the bottom-most section of your hair. Place your round brush under the section, close to the roots. Ensure the hair is wrapped smoothly around the brush.
Direct the hairdryer nozzle downwards, following the brush as you pull it through the hair. Maintain gentle tension on the hair with the brush. This tension is key to smoothing the cuticle and adding shine.
Work from roots to ends, slowly moving the brush and dryer. For volume, lift the brush upwards at the roots. For a slight curl or bend, wrap the ends around the brush and hold the dryer on them for a few seconds.
Repeat this process for each section. Always ensure the dryer nozzle is angled down the hair shaft to encourage smoothness and shine, not frizz.
Step 7: Focus on the Crown and Face-Framing Sections
Pay extra attention to the hair around your face and at your crown. These areas are often the most visible and contribute significantly to the overall look.
For face-framing pieces, dry them away from your face or forward, depending on your desired style. For the crown, lift the hair straight up with the brush. Dry it thoroughly at the roots to create maximum volume and lift.
Use the cool shot button on your hairdryer on each section once it’s dry. This helps to set the style and lock in shine. It’s like hairspray in air form.
Step 8: Set the Style and Add Finishing Touches
Once all sections are dry, allow your hair to cool completely before touching it too much. This helps the style to set and last longer. You can even pin freshly dried sections into loose curls with clips for extra hold and bounce.
Gently shake out your hair with your fingers to break up the sections. Apply a small amount of lightweight finishing oil or serum to the ends for added shine and frizz control.
Finish with a light hold hairspray, misting it evenly over your entire head. This provides extra hold without making your hair stiff. Avoid heavy hairsprays that can weigh down your blowout.
Common Mistakes to Avoid
Using Too Much Product
Over-applying styling products can quickly weigh down your hair, making it look greasy and flat. Instead of achieving volume and bounce, you’ll end up with heavy, sticky strands that won’t hold their shape.
Always start with a small amount of product, usually a dime-sized portion. You can always add a little more if needed, but it’s impossible to take it away once applied. Focus products like mousse at the roots and serums on the ends.
Not Sectioning Hair Properly
Attempting to blow dry your entire head of hair at once is a recipe for disaster. It leads to uneven drying, frizz, and a lack of control, making it impossible to achieve a smooth, polished look.
Always take the time to create clean, manageable sections. Clipping up the hair you’re not working on allows you to focus on one small section at a time, ensuring each strand is properly dried and styled. This precision is key.
Hair Too Wet or Too Dry
Starting your blowout when your hair is soaking wet will prolong the drying process unnecessarily and can lead to frizz. Conversely, if your hair is too dry, it loses its elasticity and becomes difficult to manipulate with the brush.
Aim for hair that is about 80% dry after rough drying. It should feel damp, not wet. This balance allows for optimal control, styling, and reduces heat exposure.
Incorrect Brush Size or Technique
Using a brush that’s too large for short hair or too small for long hair, or not maintaining proper tension, will hinder your results. The wrong brush or technique can lead to flat roots, frizzy ends, or a lack of desired shape.
Choose a round brush appropriate for your hair length and desired curl. Maintain consistent, gentle tension with the brush as you pull it through the hair. Always point the dryer nozzle down the hair shaft to smooth the cuticle.
Troubleshooting
My Hair Looks Frizzy and Dull
Frizz often happens when the hair cuticle isn’t smoothed down during drying. This can be caused by not using a nozzle concentrator, drying hair from too far away, or not directing airflow downwards.
Ensure your hairdryer always has its concentrator nozzle attached. Always aim the airflow down the hair shaft, following your brush. Finish each section with a cool shot to seal the cuticle and add shine.
I Can’t Get Any Volume at the Roots
Lack of volume usually stems from not lifting the hair enough at the root during drying. It might also be from using too much heavy product or not rough-drying enough.
When drying at the roots, lift the section straight up and away from your head with the round brush. Direct the heat directly at the roots, holding it there for a few seconds before moving down the shaft. Consider adding a root-lifting spray to damp hair.
My Arms Get Tired / The Blowout Takes Forever
A long, tiring blowout often indicates that your sections are too large or your rough-drying step isn’t efficient. It’s a common issue when you’re first learning the technique.
Break your hair into smaller, more manageable sections. This makes each part quicker to dry. Ensure your hair is about 80% dry from rough drying before you start using the round brush. This significantly reduces the time spent styling with the brush.
Key Takeaways
- Preparation is paramount: Start with clean, detangled, and properly towel-dried hair.
- Product placement matters: Apply heat protectant and volumizer to damp hair, focusing on roots and ends.
- Sectioning is non-negotiable: Divide your hair into small, manageable sections for maximum control and even drying.
- Master the brush and dryer: Maintain tension with your round brush and always direct the hairdryer nozzle downwards.
- Cool shot is your friend: Use the cool shot button to set the style and boost shine on each section.
- Patience and practice: Achieving a perfect blowout takes time and repetition, so don’t get discouraged!
Frequently Asked Questions
What is the best type of hairdryer for a home blowout?
An ionic or ceramic hairdryer is highly recommended. These types of dryers help to break down water molecules faster, reducing drying time and minimizing frizz. Look for one with multiple heat and speed settings, plus a cool shot button.
Can I achieve a blowout on short hair?
Absolutely! Blowouts aren’t just for long hair. For short hair, you might use a smaller round brush to create volume and shape. The principles of sectioning, tension, and directed airflow remain the same, just adapted for shorter lengths.
How long does an at-home blowout typically last?
With proper technique and good products, an at-home blowout can last anywhere from 2-4 days. Using a dry shampoo on subsequent days and sleeping on a silk pillowcase can help extend its life. Avoid excessive moisture or humidity.
What’s the difference between a blowout and just drying my hair?
Simply drying your hair involves removing moisture, often resulting in natural texture or some frizz. A blowout, however, is a styling technique that uses a hairdryer and brush to actively shape, smooth, and add volume to your hair, creating a polished, salon-finished look.
Our Top Recommended Finds
- Professional Ionic Hairdryer: Look for a powerful motor (1875W+) and ionic technology for faster drying and reduced frizz.
- Ceramic/Boar Bristle Round Brushes: A set with varying sizes (small, medium, large) allows you to tackle different hair lengths and achieve various levels of curl or volume.
- Lightweight Heat Protectant Spray: Essential for shielding hair from heat damage without weighing it down. Choose one that also offers frizz control.
Embrace Your Inner Stylist
Mastering the at-home blowout is more than just a hair routine; it’s a skill that empowers you to look and feel your best, any day of the week. The initial learning curve might feel a little challenging, but the results are incredibly rewarding.
Don’t wait for a special occasion to feel fabulous. Grab your tools, follow these steps, and start practicing today. Each attempt brings you closer to that perfectly voluminous, smooth, and shiny hair you’ve always admired.