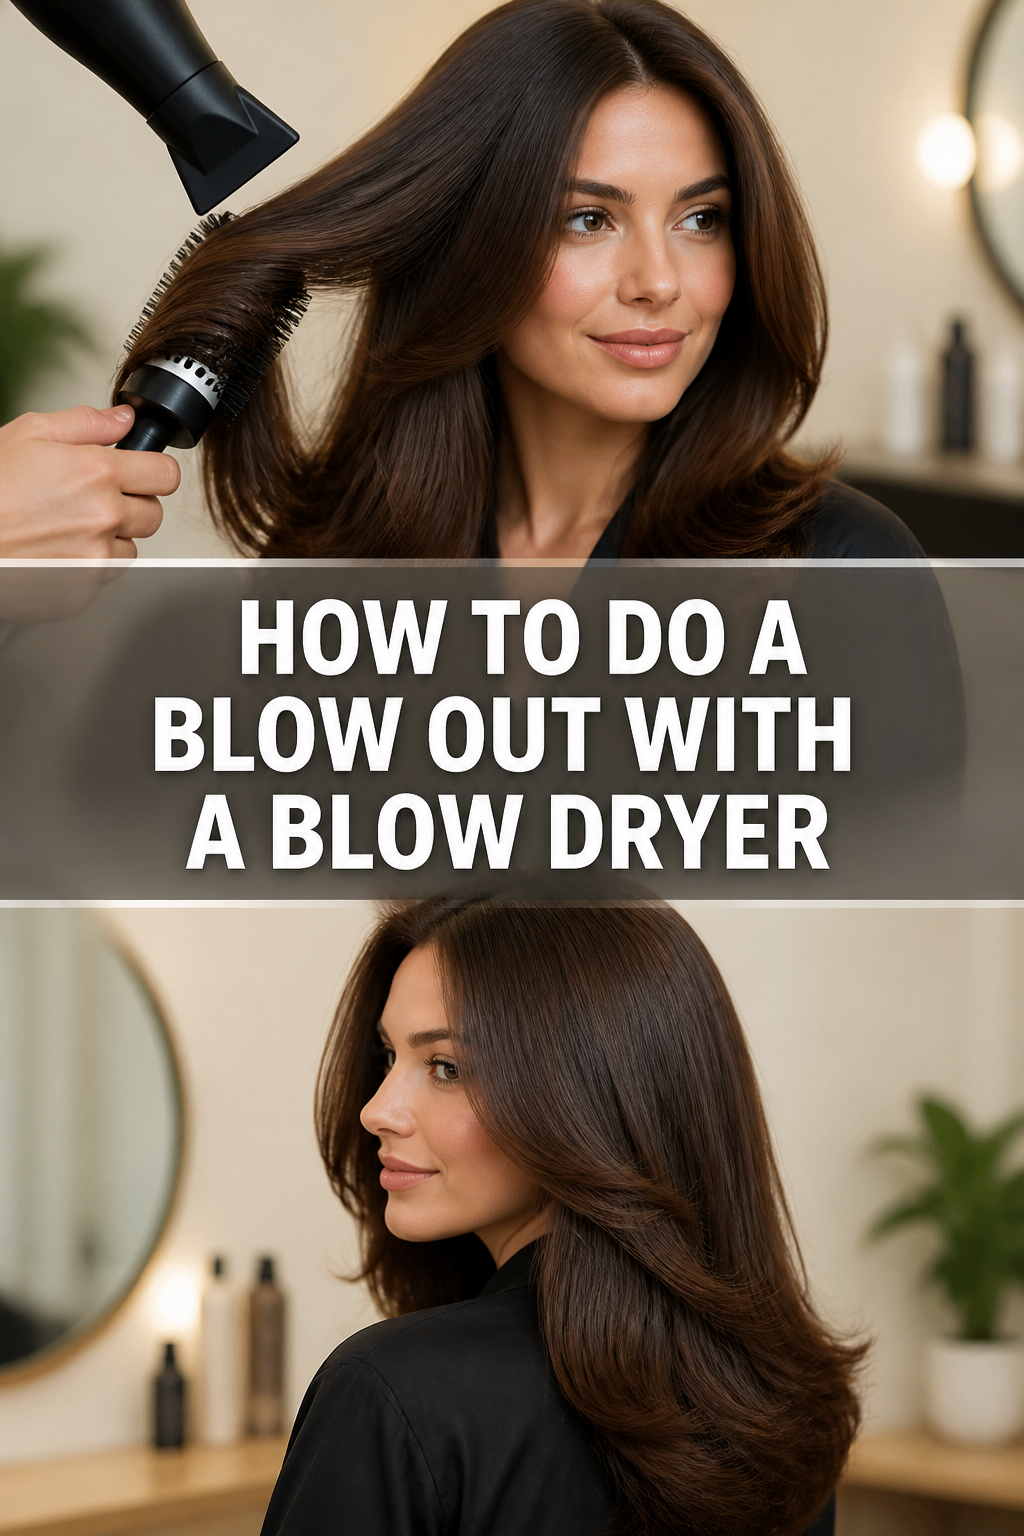
💁♀️ How To Do A Blow Out With A Blow Dryer
Remember that incredible feeling of leaving the salon with perfectly bouncy, shiny hair? I used to think that look was impossible to achieve at home. Over years of practice, I’ve cracked the code to getting those gorgeous results with just a blow dryer.
This guide shares all my best tips and tricks, helping you master a salon-quality blowout right from your own bathroom. You’ll soon have beautiful, professional-looking hair every single time.

Quick Overview
In this guide, you will learn the techniques to transform your hair into a smooth, voluminous, and long-lasting style using only a blow dryer and a few essential tools. Get ready to achieve that coveted salon finish.
- Time needed: 30-60 minutes (depending on hair length and thickness)
- Difficulty: Intermediate (requires practice, but highly rewarding)
- What you’ll need: Blow dryer with a nozzle, round brush, paddle brush, heat protectant, styling cream/mousse, hair clips, strong-hold hairspray.
Step-by-Step Instructions
Step 1: Prepare Your Hair
Starting with properly prepped hair is the secret to a lasting, beautiful blowout. This initial stage sets the foundation for shine, volume, and manageability.
It ensures your hair is clean and ready to absorb styling products effectively.
- Wash your hair thoroughly using a shampoo appropriate for your hair type. If you have product buildup, consider a clarifying shampoo first.
- Condition with a lightweight conditioner, concentrating on the mid-lengths and ends. Rinse your hair completely to avoid any heavy residue.
- Towel-dry your hair gently but thoroughly until it’s about 60-70% dry. Avoid harsh rubbing, which can cause frizz and damage.
Pro Tip: Never start a blowout on soaking wet hair. It takes too long, exposes your hair to excessive heat, and can lead to frizz. Aim for damp, not dripping, strands.
Step 2: Apply Your Products
The right styling products are crucial for protection, hold, and the desired finish. They act as a shield against heat while enhancing your hair’s natural texture.
Choose products that cater to your specific hair needs, whether it’s for volume, smoothness, or frizz control.
- Protect your hair generously with a high-quality heat protectant spray or cream. Distribute it evenly from roots to ends.
- Add a volumizing mousse or root lifter to your roots for extra body, if desired. For sleekness, apply a small amount of smoothing cream to the mid-lengths and ends.
- Comb through your hair with a wide-tooth comb or paddle brush to distribute the products evenly. This also helps detangle any knots without pulling.
Step 3: Rough Dry Your Hair
Rough drying is an essential first step that removes excess moisture quickly and efficiently. It prepares your hair for more precise styling.
This stage reduces overall drying time and minimizes heat exposure during the more detailed sections.
- Attach the nozzle to your blow dryer. This attachment concentrates the airflow, which is vital for smooth results.
- Set your blow dryer to a medium heat and medium speed setting. Avoid using the highest heat at this stage.
- Flip your head upside down or gently toss your hair from side to side as you rough dry. Use your fingers to lift the roots and encourage airflow.
- Continue rough drying until your hair is about 80-85% dry. It should feel mostly dry but still have a slight coolness to the touch.
Step 4: Section Your Hair
Proper sectioning makes the blowout process much more manageable and effective. It allows you to work on smaller, more controlled portions of hair.
This prevents tangles and ensures every strand receives adequate attention and heat.
- Divide your hair into manageable sections using hair clips. Start by creating a horizontal part from ear to ear across the back of your head.
- Clip the top section of hair up and out of the way. You will be working on the bottom section first.
- Create smaller, vertical subsections within the bottom layer. Each subsection should be no wider than your round brush.
- Continue working your way up your head, creating horizontal sections and then smaller vertical subsections.
Step 5: Blow Dry the Bottom Sections
Begin styling the lowest sections of your hair, as this provides a foundation for the layers above. Focus on creating tension and smoothness.
This initial work sets the stage for a uniform and polished overall look.
- Take your first subsection of hair. Place your round brush underneath the section, close to the roots.
- Direct the blow dryer nozzle downwards, following the brush as you pull it through the hair. The nozzle should always point down the hair shaft.
- Maintain consistent tension on the hair with your brush as you move it from roots to ends. This helps to smooth the cuticle and add shine.
- Repeat this motion several times on each subsection until it is completely dry and smooth. For a slight curl, roll the ends under and hold the dryer for a few seconds.
Step 6: Work Your Way Up and Around
As you move to the middle and upper sections of your hair, adjust your technique to build volume and shape. These layers are more visible and contribute significantly to the overall style.
Focus on lifting the roots and directing the hair away from your face for a flattering finish.
- Release a new section of hair from your clips. Continue to take small subsections, no wider than your brush.
- For volume at the crown, lift the hair straight up at the roots with your brush. Direct the heat upwards and outwards.
- To frame your face, dry the sections around your face by pulling them slightly away from your face with the brush. This creates a soft, sweeping effect.
- Ensure each subsection is fully dry before moving to the next. Undried sections can lead to frizz and a quickly deflating style.
Pro Tip: After drying each section, hit it with a blast of cool air from your blow dryer. This “cool shot” feature helps to set the style and lock in shine by closing the hair cuticle.
Step 7: Perfect the Top Layer and Bangs
The top layer and any bangs or fringe are often the most prominent parts of your blowout. Pay extra attention to these sections for a polished look.
Precision here makes a significant difference in the final appearance of your style.
- Dry the very top section of your hair, often referred to as the crown. Lift these sections straight up from the scalp to maximize volume.
- For bangs or fringe, use a smaller round brush if needed. Dry them by pulling the brush downwards and slightly inwards, following the natural curve of your forehead.
- Avoid over-drying bangs, as they can become stiff or too curly. A quick pass is usually sufficient.
- Check all sections for any remaining dampness or areas that need extra smoothing. Address these before moving to the finishing touches.
Step 8: Finish and Set Your Style
Once all sections are dry, the final steps involve refining your look and ensuring it lasts. This includes adding shine and securing the style.
These finishing touches elevate your blowout from good to truly great.
- Apply a small amount of shine serum or lightweight hair oil to your palms. Gently smooth it over the mid-lengths and ends of your hair.
- Finger-comb through your hair lightly to break up any stiff sections and blend the layers. Avoid using a brush at this stage, which can flatten volume.
- Hold your style in place with a flexible or medium-hold hairspray. Spray from a distance of about 10-12 inches to ensure even distribution and avoid stiffness.
- Resist the urge to touch your hair too much after styling, as this can transfer oils and cause your blowout to fall flat more quickly.
Common Mistakes to Avoid
Starting with Soaking Wet Hair
Many people try to blow dry their hair when it’s still dripping wet. This is a common pitfall that prolongs drying time significantly. It also exposes your hair to excessive heat for an extended period, which can lead to damage, dryness, and a lack of shine.
Always towel-dry your hair until it’s about 60-70% dry before you even pick up your blow dryer. This protects your hair and makes the process more efficient.
Skipping Heat Protectant
Neglecting to use a heat protectant is a major oversight that can severely compromise hair health. Without this protective barrier, the high heat from your blow dryer can strip moisture, cause split ends, and lead to breakage.
Make heat protectant an absolute non-negotiable step in your routine. Apply it generously and evenly from roots to ends before any heat styling.
Not Using a Nozzle
Blowing air aimlessly without a nozzle can lead to a frizzy, unpolished result. The nozzle attachment is designed to concentrate the airflow, directing it precisely where you need it.
Always attach the nozzle to your blow dryer. Point it downwards, following your brush as you dry each section, to smooth the hair cuticle and achieve that coveted sleekness.
Improper Sectioning
Trying to dry large, unmanageable sections of hair is a recipe for frustration and uneven results. It makes it difficult to apply consistent tension and heat to every strand.
Take the time to properly section your hair into smaller, manageable portions. This ensures each piece gets fully dried and styled, leading to a much more uniform and professional finish.
Troubleshooting
Hair Falls Flat Quickly
If your blowout loses its volume and bounce too soon, it might be due to a few factors. You might not be fully drying each section or using enough volumizing product at the roots.
Ensure every section is bone dry, especially at the roots, before moving on. Use the cool shot to set each section. Consider a stronger volumizing mousse or root lifter applied to damp roots before you begin. You can also try backcombing lightly at the roots for extra hold.
Ends Look Frizzy or Damaged
Frizz and damaged ends often indicate that you’re either using too much heat, not enough heat protectant, or you’re not directing the nozzle correctly. Over-drying the ends can also contribute to this problem.
Always use a heat protectant. Ensure your blow dryer nozzle is pointing downwards along the hair shaft to smooth the cuticle. Avoid holding the dryer on the ends for too long; once they’re dry, move on. A lower heat setting can also help.
Hair Feels Stiff or Crunchy
This usually happens when too much product is applied, or the product used is too heavy for your hair type. It can also occur if hairspray is applied too close or too heavily.
Use styling products sparingly, especially creams and mousses. Start with a small amount and add more only if needed. When applying hairspray, hold the can at least 10-12 inches away from your head and use a light, sweeping motion.
Key Takeaways
- Preparation is paramount: Always start with towel-dried hair and heat protectant.
- Sectioning simplifies the process and ensures an even, smooth finish.
- Direct the nozzle downwards, following your brush, to smooth the hair cuticle and add shine.
- Use the “cool shot” feature to set each section and lock in your style.
- Practice makes perfect; don’t get discouraged if your first attempt isn’t flawless.
- Choose products wisely to add volume, smoothness, and protect your hair from heat.
Frequently Asked Questions
Can I do a blowout on short hair?
Absolutely! Blowouts work wonderfully on short hair, adding volume, texture, and shape. You might need to use a smaller round brush to properly grip and style shorter sections. The principles of sectioning and directing airflow remain the same.
How often should I wash my hair if I blowout regularly?
This depends on your hair type and lifestyle. Many people find they can extend their blowout for 2-3 days by using dry shampoo on non-wash days. Washing too frequently can strip natural oils, while washing too little can lead to product buildup. Listen to your hair.
What’s the best type of brush for a blowout?
A round brush is essential for creating volume and shape. The size depends on your hair length: larger brushes for longer hair to create bigger waves, and smaller brushes for shorter hair or tighter curls. A paddle brush is great for rough drying and detangling.
How can I make my blowout last longer?
To extend your blowout, avoid touching your hair excessively. Use a dry shampoo on roots on day two or three to absorb oil. Sleep on a silk pillowcase to reduce friction and frizz. You can also loosely tie your hair in a high bun or pineapple style overnight to preserve volume.
Our Top Recommended Finds
- Professional Blow Dryer with Nozzle: A high-quality dryer with multiple heat and speed settings makes a significant difference in drying time and results.
- Ceramic Round Brush Set: Ceramic brushes heat up evenly and help to smooth hair, while a set provides various sizes for different hair lengths and styles.
- Lightweight Heat Protectant Spray: Essential for shielding your hair from thermal damage without weighing it down.
Embrace Your Inner Stylist
Mastering the art of the at-home blowout is a skill that truly empowers you. It’s about more than just styling your hair; it’s about taking control of your look and boosting your confidence.
Don’t let the initial learning curve deter you. Each time you practice, you’ll gain more control, speed, and precision. You’ll soon find yourself effortlessly creating beautiful, salon-worthy hair.
Grab your tools, follow these steps, and start transforming your hair today. The gorgeous, bouncy blowout you’ve always admired is well within your reach.