✏️ How To Put Your Hair Up With A Pencil
We have all been there, sitting at a desk with hair falling into our eyes and no hair tie in sight.
I first learned this trick during a grueling final exam when my ponytail holder snapped, leaving me desperate for a solution.
Since that day, I have mastered the art of the pencil bun and used it as my go-to styling hack for over a decade.
Quick Overview
Putting your hair up with a pencil is a functional, stylish, and incredibly fast way to manage your mane without damaging it with elastic bands.
- Time needed: 30 to 60 seconds
- Difficulty: Beginner
- What you’ll need: One standard pencil (preferably unsharpened or with a dull point) and mid-to-long length hair.
Step-by-Step Instructions
Step 1: Prepare Your Hair
Start by detangling your hair thoroughly with a brush or your fingers to ensure there are no major knots.
Smooth hair allows the pencil to glide through the layers without snagging or causing breakage during the locking process.
If your hair is particularly silky or freshly washed, you might want to add a bit of dry shampoo or texture spray to give it some “grip.”
Pro Tip: Slightly “dirty” hair or hair with natural oils usually holds a pencil bun much better than hair that is slippery and clean.
Step 2: Gather Into a Ponytail
Collect all of your hair at the back of your head as if you were about to put it into a standard ponytail.
You can choose the height of your bun based on your preference; a high bun looks more playful, while a low bun offers a sophisticated, professional vibe.
Ensure you have a firm grip on the base of the ponytail with your non-dominant hand so the hair stays taut against your scalp.
Step 3: Twist the Length
Begin twisting the entire length of your ponytail in one direction, either clockwise or counter-clockwise.
Keep twisting until the hair begins to coil naturally around itself at the base near your head.
The tighter you twist, the more secure the final bun will be, but be careful not to pull so hard that it causes discomfort to your scalp.
Step 4: Coil Into a Bun
Wrap the twisted length of hair around the base of the ponytail to create a classic cinnamon roll shape.
Tuck the ends of your hair underneath the outer layer of the coil to keep them hidden and secure.
Hold the bun firmly against your head with one hand while you reach for your pencil with the other.
Pro Tip: If you have very thick hair, try to keep the coil relatively flat against your head rather than building it outward like a tower.
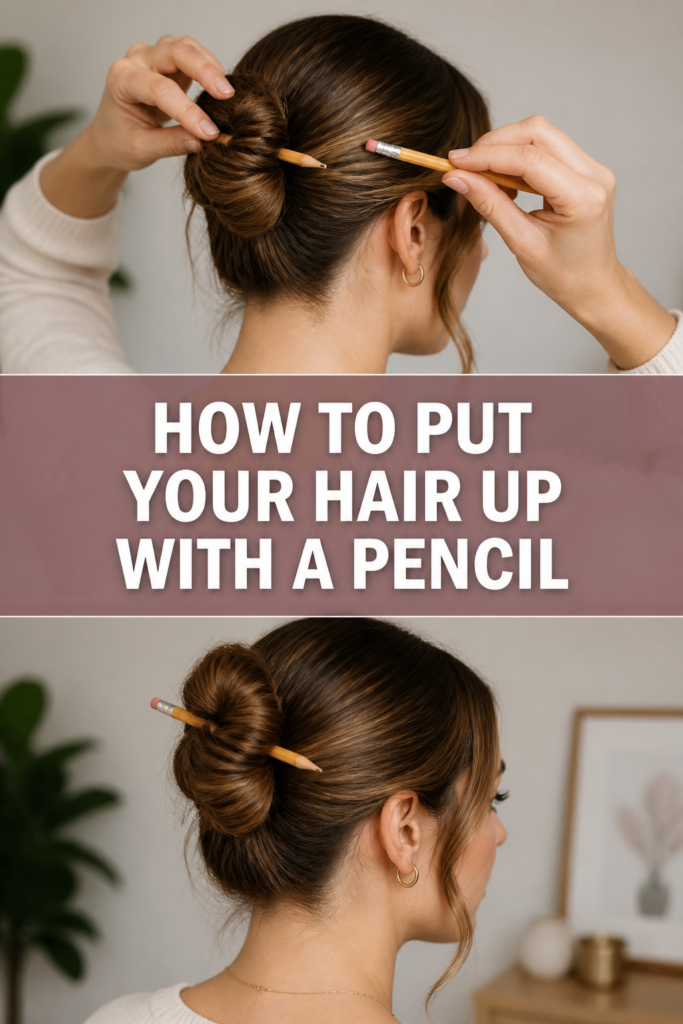
Step 5: Insert the Pencil
Slide the pencil into the very top edge of the bun, aiming it downward toward the center.
You want to catch just a small amount of hair from the top outer loop of the bun as you start the insertion.
At this stage, the pencil should be angled slightly away from your scalp, pointing toward the floor.
Step 6: The Pivot and Push
Rotate the pencil 180 degrees so that the tip now points upward or horizontally across the bun.
As you pivot, the pencil should grab a bit of the hair that is anchored tightly against your scalp.
This “weaving” motion is what creates the mechanical tension necessary to hold the weight of your hair without any clips.
Step 7: Secure the Hold
Push the pencil all the way through the bun until the tip emerges from the opposite side.
You should feel a slight increase in tension as the pencil settles into place, locking the hair against your head.
Give your head a gentle shake to test the stability; if it feels loose, you may need to re-insert the pencil with a deeper pivot.
Pro Tip: Use an unsharpened pencil if possible to avoid accidentally scratching your scalp or poking yourself during the day.
Common Mistakes to Avoid
Using a Sharp Pencil
One of the most frequent errors is using a freshly sharpened pencil with a needle-thin lead point.
Not only can this lead to painful scalp pricks, but it can also snag and tear individual hair strands as you push it through the coil.
Always opt for a dull pencil, a pen with a cap, or even a dedicated hair stick to ensure the process remains safe and comfortable.
Twisting Too Loosely
If your initial twist is too loose, the bun will likely collapse the moment you let go or move your head.
The pencil relies on the internal friction of the hair loops to stay in place, and loose hair provides very little resistance.
Focus on creating a firm, rope-like twist before you start coiling the hair into the bun shape.
Incorrect Insertion Angle
Many beginners try to push the pencil straight through the bun without performing the necessary pivot move.
A straight push usually misses the scalp hair entirely, meaning the pencil is only holding the bun to itself rather than to your head.
Remember that the “weaving” motion—catching the bun, hitting the scalp hair, and then exiting the bun—is the secret to a long-lasting hold.
Troubleshooting
Hair Slipping Out
If your hair is very fine or straight, you might find the pencil sliding out within minutes of putting it up.
To fix this, try the “double weave” technique where you weave the pencil in and out of the bun twice before pushing it through.
Alternatively, applying a small amount of sea salt spray can increase the friction between your hair strands and the pencil surface.
The Bun Feels Too Heavy
If you feel a constant pulling sensation or a headache starting, the bun is likely positioned too high or is twisted too tightly at the roots.
Try lowering the bun to the nape of your neck, which allows the weight to be distributed more evenly across the back of your head.
You can also try a “figure-eight” wrap instead of a circular coil to spread the mass of the hair over a larger surface area.
Short Layers Popping Out
For those with layered haircuts, the shorter pieces often stick out like a pincushion once the bun is secured.
You can solve this by twisting the hair more tightly and using a tiny bit of hairspray or pomade on the ends before coiling.
If pieces still escape, simply tuck them back under the main body of the bun and use the pencil to pin them down as you slide it through.
Key Takeaways
- Preparation is key: Detangle your hair and add texture if your strands are too slippery for a natural hold.
- Master the pivot: The 180-degree turn of the pencil is what creates the tension needed to secure the bun to your scalp.
- Safety first: Use dull or unsharpened pencils to prevent scalp irritation and hair breakage.
- Texture matters: Second-day hair often holds a pencil bun much better than freshly washed hair.
- Tension balance: Ensure the bun is tight enough to stay up but loose enough to avoid causing tension headaches.
- Experiment with height: Different bun positions offer different levels of comfort and security depending on your hair’s weight.
Frequently Asked Questions
Can I use a pen instead of a pencil?
Yes, most pens work just as well as pencils, provided they have a smooth barrel and are long enough to span the width of your bun.
Avoid pens with rubber grips that are too “sticky,” as they can pull on your hair and make the insertion process difficult.
Click-top pens are generally fine, but pens with removable caps are often more secure because the cap provides an extra ledge to prevent sliding.
Will this damage my hair over time?
Actually, using a pencil or hair stick is often much healthier for your hair than using traditional elastic ties.
Elastic bands can cause “ponytail breakage” where the hair snaps at the site of the tie due to constant pressure and friction.
A pencil bun distributes the weight more broadly and doesn’t squeeze the hair shaft, making it a great protective style.
How long does my hair need to be?
Generally, your hair needs to be at least shoulder-length to successfully complete a pencil bun.
If your hair is shorter, you may struggle to get the ends to stay tucked, or the pencil may not have enough hair to “grab.”
For those with very long hair (past the waist), you might need two pencils crossed in an “X” shape to support the extra weight.
Is it okay to do this with wet hair?
You can put wet hair up with a pencil, but you should be extra cautious because hair is more fragile when it is saturated with water.
Wet hair also shrinks as it dries, which could cause the bun to become painfully tight over several hours.
If you must do this with wet hair, keep the twists slightly looser than you would with dry hair to allow for that natural shrinkage.
Our Top Recommended Finds
- Standard Ticonderoga Pencils: These have a classic matte finish that provides the perfect amount of grip without being too rough on the hair.
- Handcrafted Wooden Hair Sticks: If you love the pencil bun look, upgrading to a smooth wooden hair stick can offer a more polished appearance for the office.
- Dry Texture Spray: A quick spritz of this before you twist will help the pencil stay in place all day, even if you have very fine hair.
Mastering Your New Favorite Hairstyle
Now that you know the secrets of the pencil bun, you will never be at the mercy of a broken hair tie again.
This technique is not just a survival hack; it is a versatile style that works for the gym, the office, or a casual night out.
Try practicing the “pivot and push” move a few times in front of a mirror to build your muscle memory.
Once you have the basics down, you can start experimenting with different tools like chopsticks, paintbrushes, or even decorative sticks.
Go ahead and grab a pencil from your desk right now and give it a try—your hair will thank you for the break from elastics.