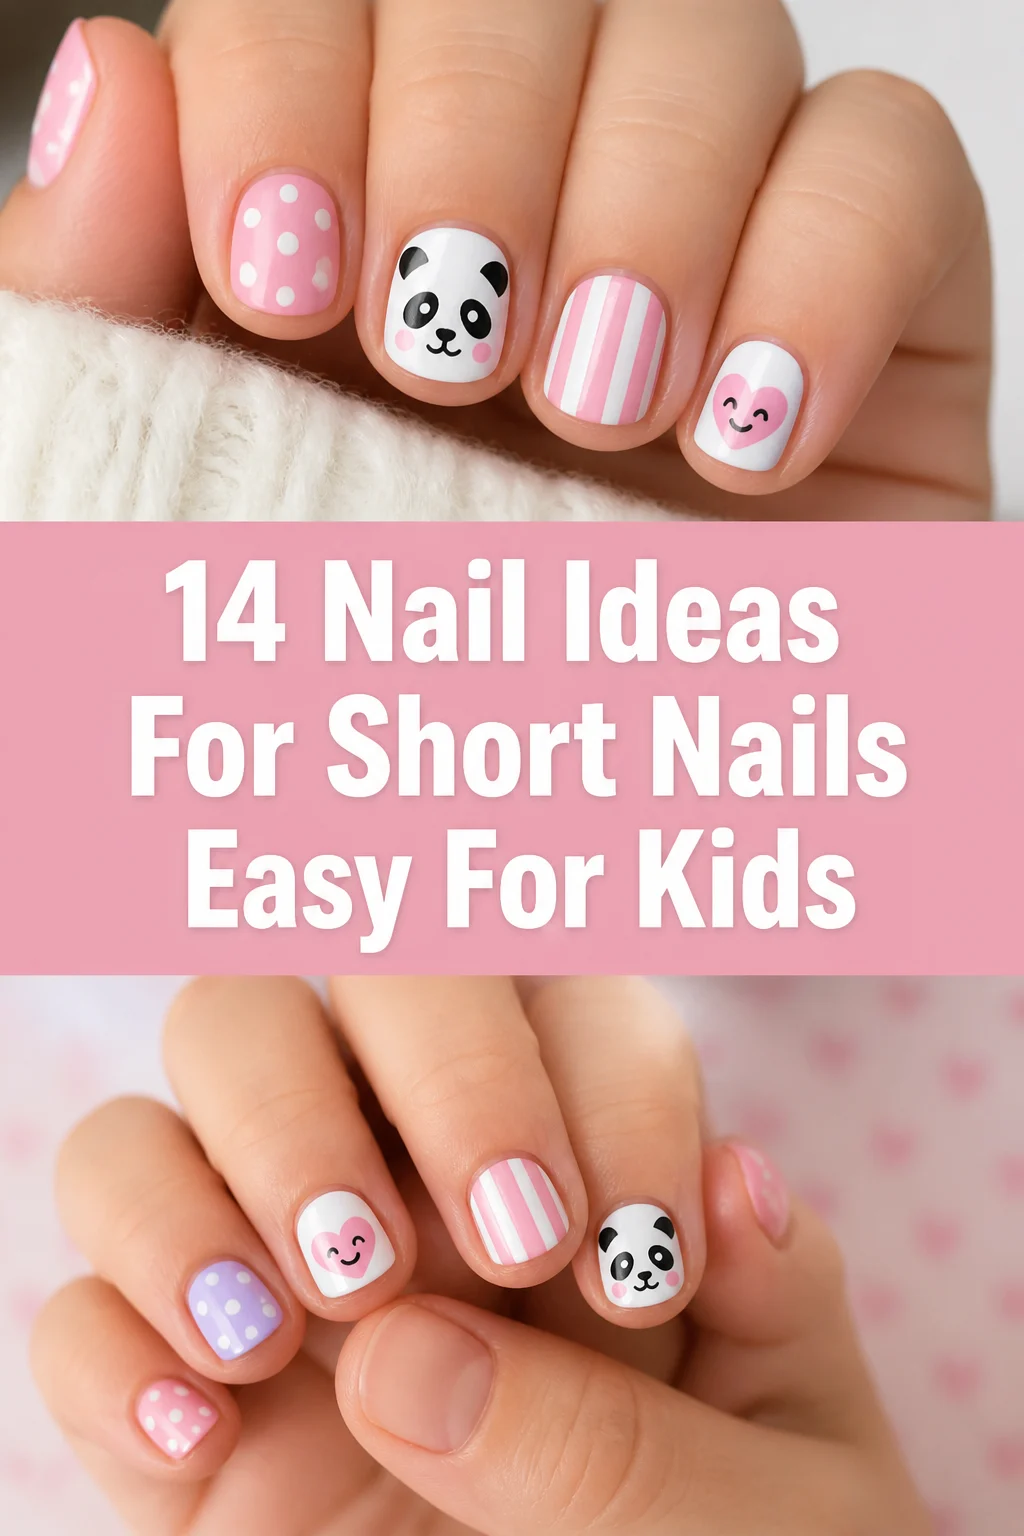
💅 14 Nail Ideas For Short Nails Easy For Kids
Okay, parents, we know the struggle is real.
Your little one wants fabulous nails, but their tiny canvases aren’t exactly runway-ready, right?
Fear not, because we’ve got 14 super cute, super easy ideas perfect for those adorable short nails.
No fancy salon skills required, just a little polish and a whole lot of fun.

1. Polka Dot Power
- Best For: Toddlers and preschoolers learning to steady their hands.
- Vibe: Playful and cheerfully classic.
- Why it works: Dots are forgiving and look adorable on small nails.
Who doesn’t love a good polka dot? Grab a few of their favorite bright nail polish colors and a dotting tool (or even a toothpick’s blunt end).
Paint a base color, let it dry, then dip your tool into a contrasting color and gently press dots all over. Think pink with white dots or blue with yellow.
Pro Tip: Use a clear top coat to seal those dots in for extra playtime durability.
2. Rainbow Brights
- Best For: Kids who can’t pick just one color (which is, let’s be honest, all of them).
- Vibe: Joyful and vibrant.
- Why it works: Each nail gets its own moment to shine, no complex art needed.
This one is a no-brainer and surprisingly chic for tiny fingers. Simply paint each nail a different color of the rainbow.
Start with red on the thumb, then orange, yellow, green, and blue on the pinky. Maybe even add a purple if you’re feeling extra.
Pro Tip: Let each color dry a little before moving to the next finger to avoid smudges – patience is a virtue, even for nail art.
3. Glitter Galore
- Best For: Sparkle enthusiasts of all ages.
- Vibe: Dazzling and celebratory.
- Why it works: Glitter hides a multitude of application sins and looks fantastic.
When in doubt, add glitter. Apply a generous coat (or two) of their favorite glitter polish directly onto the nail.
You can use a clear glitter polish over a solid color or go full-on opaque glitter. The more sparkle, the better, obviously.
Pro Tip: Opt for a chunky glitter polish for maximum impact and less chance of looking like a subtle shimmer. Go big or go home.
4. Sticker Fun
- Best For: The impatient artist or those needing a quick fix.
- Vibe: Whimsical and themed.
- Why it works: Nail stickers do all the hard work for you.
Nail stickers are your secret weapon, seriously. Paint a base color (or just use clear polish), let it dry completely, then apply the mini nail stickers.
There are tons of options, from tiny flowers and stars to cartoon characters. Just press them on and seal with a top coat.
Pro Tip: Look for stickers specifically designed for kids’ nails – they’re usually smaller and easier to manage.
5. Stripes Away
- Best For: Slightly older kids with a steadier hand, or patient parents.
- Vibe: Playful yet structured.
- Why it works: Simple lines make a big visual impact.
Stripes can be surprisingly easy. Paint a base color and let it dry. Then, use a thin nail art brush or a striping tape to create simple lines.
Horizontal stripes are easier on short nails. Try white stripes on a navy blue base for a classic look, or multi-colored lines for a vibrant feel.
Pro Tip: If using striping tape, remove it while the polish is still slightly tacky but not wet to get a crisp line.
6. Heart-y Nails
- Best For: Valentine’s Day or just spreading some love.
- Vibe: Sweet and affectionate.
- Why it works: Small hearts are universally adored and surprisingly simple to draw.
Tiny hearts are adorable on short nails. Paint a light base color, then use a dotting tool to make two small dots close together.
Drag a toothpick from the bottom center of the dots downwards to form the point of the heart. Voila, instant cuteness.
Pro Tip: Practice on paper first to get the hang of the heart shape before tackling those tiny nails. No pressure, just fun.
7. Ombre Magic
- Best For: Kids who love a subtle gradient effect.
- Vibe: Dreamy and artistic.
- Why it works: Blending colors looks impressive but is actually quite simple.
Ombre is easier than it sounds for kids. Paint a base color, then dab two similar shades (like light blue and dark blue) onto a makeup sponge.
Gently dab the sponge onto the nail, blending the colors together. Repeat for intensity, then finish with a top coat.
Pro Tip: Use a cotton swab dipped in nail polish remover to clean up any excess polish around the cuticles for a neat finish.
8. Animal Prints (Simplified)
- Best For: Little wild ones who love critters.
- Vibe: Fiercely fun.
- Why it works: Abstract spots are forgiving and still convey the animal print idea.
Forget intricate leopard spots. For kids, think abstract. Paint a base color like yellow for cheetah or white for cow print.
Then, use a small brush or toothpick to dab on irregular black or brown spots. Don’t worry about perfection; messy is part of the charm.
Pro Tip: Less is more when it comes to simplified animal prints. A few well-placed blobs work wonders.
9. Fruit Frenzy
- Best For: Summer vibes or snack enthusiasts.
- Vibe: Fresh and juicy.
- Why it works: Simple fruit designs are instantly recognizable and cheerful.
Think simple fruit outlines. Paint a red base for strawberries, then add tiny green leaves at the cuticle and a few black dots for seeds.
Or, for watermelon, paint a green tip, then a white stripe, and finally a pink/red base with small black seed dots. Deliciously cute.
Pro Tip: Use the smallest dotting tool or even the tip of a sewing pin for those tiny fruit seeds. Be careful, obviously.
10. Sparkle Tips
- Best For: A subtle touch of glam without going full glitter bomb.
- Vibe: Elegant and shimmery.
- Why it works: It’s a French manicure with a fun, kid-friendly twist.
This is a glittery twist on a classic. Paint the whole nail with a clear or light pink base coat. Once dry, apply a chunky glitter polish just to the very tips of the nails.
You can make it a neat line or a slightly messy, faded glitter look. Either way, it’s super cute and sparkly.
Pro Tip: Use a sponge to dab the glitter onto the tips for a softer, more diffused sparkle effect.
11. Mismatch Mania
- Best For: The truly indecisive or creatively adventurous.
- Vibe: Eclectic and unique.
- Why it works: Every nail is a surprise, and there’s no pressure for uniformity.
Why pick one design when you can pick five (or ten)? Paint each nail with a completely different color or simple design.
One nail could be polka dots, the next glitter, then a solid color, a stripe, and maybe a heart. It’s organized chaos, and kids love it.
Pro Tip: Let your child choose the design for each nail. It’s their canvas, after all, and reduces the chance of a “but I wanted purple on THAT one!” meltdown.
12. Emoji Express
- Best For: Tech-savvy kids who live for their emojis.
- Vibe: Modern and expressive.
- Why it works: Simple emoji faces are instantly recognizable and fun.
Paint a bright yellow base on each nail. Once dry, use a thin brush and black polish to draw simple eyes and a smile (or a frown, or a cheeky tongue).
A simple winking face or a straightforward smiley is usually the easiest. Add tiny red hearts for eyes if they’re feeling extra. No need for perfection, just the vibe.
Pro Tip: Keep the emoji designs super basic. A dot for an eye and a curved line for a mouth is often enough to get the message across.
13. Galaxy Glam
- Best For: Aspiring astronauts and space lovers.
- Vibe: Mystical and awe-inspiring.
- Why it works: Dark colors and speckles create a cool cosmic effect.
Start with a dark blue or black base coat. While still slightly wet, dab on tiny specks of white, silver, or light blue polish using a sponge or a thin brush.
It’s meant to look like distant stars and nebulae, so embrace the randomness. Finish with a glitter top coat for extra cosmic sparkle.
Pro Tip: Use a piece of old sponge to dab on the “stars” for a more realistic, cloudy galaxy effect.
14. Ocean Waves
- Best For: Beach babies and mermaid dreamers.
- Vibe: Calm and refreshing.
- Why it works: Simple wavy lines are easy to achieve and look super cool.
Paint a base of light blue or aqua polish. Once dry, use a thin brush and white polish to draw simple, undulating wave lines across the nail.
You can do one or two waves per nail. Add a tiny dot of yellow for a sun or a sprinkle of glitter for a mermaid effect if you’re feeling ambitious.
Pro Tip: Use a slightly thicker polish for the waves to prevent it from bleeding into the base color too much.
Our Top Recommended Finds
- Kid-Friendly Peel-Off Nail Polish Set: No harsh removers needed, making cleanup a breeze and less of a chore.
- Nail Art Dotting Tool Kit: Essential for those perfect polka dots, tiny hearts, and even easier cleanup than a toothpick.
- Gentle Nail Polish Remover Wipes: For quick changes between designs without the strong smell or mess of liquid remover.
Which of these will you try first?
So there you have it, 14 super adorable ways to make those tiny fingertips shine without the fuss!
We’re pretty sure these ideas will have your little one feeling like the ultimate style icon.
Which one are you going to tackle this weekend with your little artist? Tell us below!