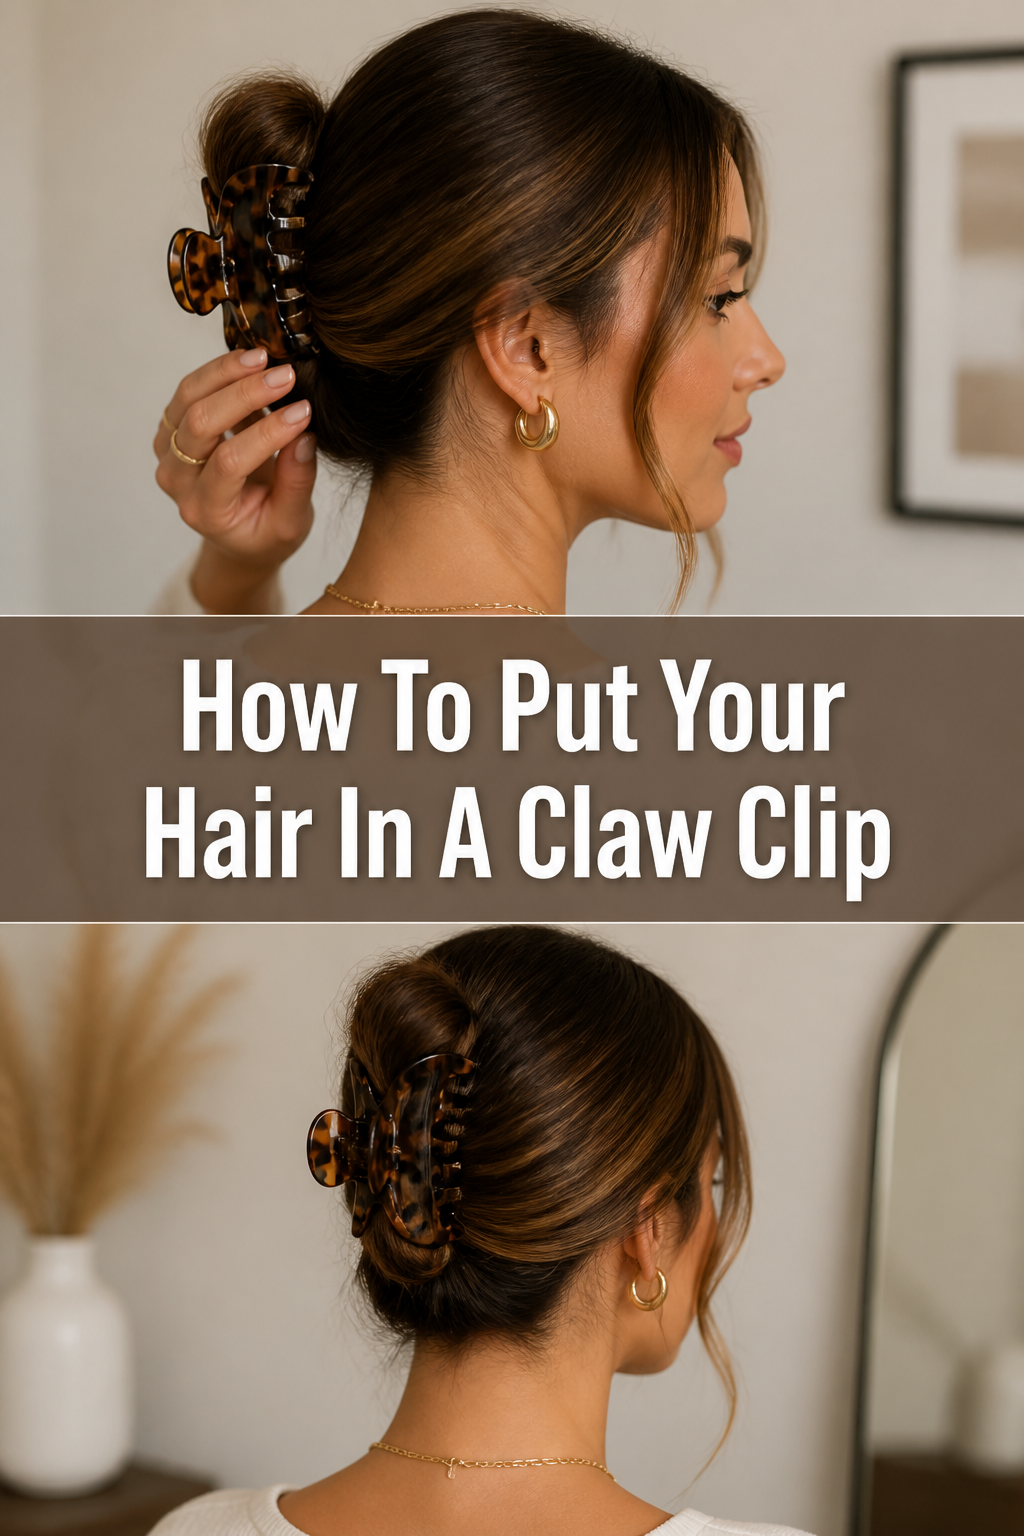
💅 How To Put Your Hair In A Claw Clip
I remember struggling with complicated updos, always wishing for something quick and chic. The claw clip became my secret weapon for effortless style. This guide shares everything I’ve learned, making it simple for you to master this versatile look.

Quick Overview
This guide will empower you to create various stylish and secure claw clip updos. You’ll learn the techniques to hold your hair perfectly, no matter its length or texture.
- Time needed: 2-5 minutes
- Difficulty: Beginner
- What you’ll need: A claw clip, hairbrush or comb, optional hair spray
Step-by-Step Instructions
Step 1: Choose Your Clip and Prepare Your Hair
The right clip is essential for a secure and comfortable hold. Your hair’s length and thickness will influence the best size and style.
- Select a claw clip that suits your hair. Thicker, longer hair benefits from larger, stronger clips, while smaller clips work well for half-up styles or finer hair.
- Brush your hair thoroughly to remove any tangles. This step ensures a smooth, snag-free process and a neater final look.
Pro Tip: Consider the material of your clip. Metal clips offer a strong grip, while acetate or plastic clips are lighter and come in endless color variations.
Step 2: Decide On Your Desired Style
Claw clips offer incredible versatility, from a classic French twist to a relaxed messy bun. Visualizing your end goal helps guide your hand.
- Picture the style you want to achieve. This could be a full updo, a half-up style, or a low, elegant twist.
- Consider the occasion. A sleek, polished look might be perfect for work, while a loose, bouncy style suits a casual outing.
Step 3: Gather Your Hair
This is the foundational step for any claw clip style. How you gather your hair will dictate the shape and security of your updo.
- Collect all your hair into a ponytail at the desired height. For a classic updo, this is usually at the back of your head, around eye level.
- Smooth any bumps or stray hairs as you gather. Use your brush or hands to ensure a clean base, especially if you’re aiming for a polished look.
Step 4: Twist Your Hair Upwards
The twisting motion is key to creating the structure that the claw clip will hold. This step builds volume and shape.
- Twist your gathered ponytail tightly upwards towards your head. Aim to create a single, cohesive rope of hair.
- Continue twisting until your hair forms a vertical coil against the back of your head. The tightness of the twist affects the security and neatness.
Pro Tip: For extra volume, gently backcomb the roots of your ponytail before twisting. This adds a little lift before the clip goes in.
Step 5: Fold and Position the Twist
Now, you’ll prepare the twisted hair for the clip. This involves folding it down to create a compact shape.
- Fold the twisted hair down against your head. The ends of your hair should now point downwards, covering the twisted section.
- Ensure the fold is snug against your scalp. This creates a sturdy base for the clip to latch onto.
Step 6: Open and Secure the Claw Clip
This is the moment of truth where the clip does its job. Precise placement is crucial for comfort and hold.
- Open your claw clip wide using both hands. Position it so that one side is ready to scoop up the folded hair.
- Place the bottom teeth of the clip underneath the base of your folded hair, right against your scalp. Aim to catch both the folded hair and a small amount of the hair closest to your head.
- Close the clip firmly over the entire twisted and folded section. Make sure it feels secure without pulling too tightly.
Step 7: Adjust and Refine Your Style
A few final touches can transform a basic clip-up into a stylish statement. Personalize your look to perfection.
- Gently tug on a few strands around your face to soften the look. This creates a more natural, less severe appearance.
- Check for any loose ends or stray hairs. Tuck them into the clip or use a little hairspray to keep them in place.
- Ensure the clip feels comfortable and balanced. If it feels lopsided or too tight, carefully remove it and try again.
Common Mistakes to Avoid
Using the Wrong Size Clip
Many people grab any clip available, which often leads to discomfort or a loose style. A clip that is too small won’t hold thick hair securely, causing it to fall out. Conversely, a clip that is too large for fine hair might slip or look disproportionate. Always match the clip size to your hair’s volume and length for optimal hold and aesthetics.
Not Detangling Hair First
Skipping the brush before styling can result in a messy, bumpy updo. Tangled hair prevents a smooth twist, making it harder for the clip to get a good grip. It can also cause unnecessary pulling and discomfort when trying to secure the clip. A few seconds spent detangling saves frustration later.
Clipping Too Loosely or Too Tightly
A clip that’s too loose will slide out, leaving your hair falling throughout the day. If it’s too tight, it can cause headaches and discomfort, not to mention potential hair damage from excessive pulling. Aim for a firm, secure hold that feels comfortable and doesn’t pull on your scalp.
Ignoring Hair Texture
Different hair textures require slight adjustments. Very silky hair might need a stronger grip clip or a little texturizing spray to prevent slippage. Curly hair might benefit from a looser twist to maintain its natural bounce. Understanding your hair’s unique needs helps in achieving a lasting style.
Troubleshooting
My Clip Keeps Sliding Out
This is a common issue, often caused by using a clip that’s too small or not gathering enough hair. Ensure you’re selecting a clip robust enough for your hair’s volume. When securing, try to catch a small section of hair directly from your scalp with the clip’s bottom teeth, not just the twisted hair. A light mist of texturizing spray on your hair before twisting can also add grip.
I Get a Headache When Wearing a Claw Clip
Headaches usually signal that the clip is too tight or placed incorrectly. Re-evaluate your twisting technique; it might be too severe. Try loosening the twist slightly before folding and clipping. Also, ensure the clip isn’t digging into your scalp. Adjust its position to distribute the pressure more evenly, moving it slightly up or down.
My Hair Looks Messy/Bumpy
A messy look can stem from not thoroughly brushing your hair beforehand or an uneven twist. Start by ensuring your hair is completely detangled and smooth before gathering. When twisting, try to keep the tension consistent from roots to ends. For a smoother finish, you can also apply a small amount of styling cream or serum to tame flyaways before you begin.
Key Takeaways
- Choose the Right Clip: Match your clip size and strength to your hair’s thickness and length for the best hold.
- Prepare Your Hair: Always detangle your hair first to ensure a smooth, bump-free style.
- Master the Twist: A firm, consistent upward twist forms the stable foundation for your updo.
- Secure with Precision: Aim to catch both the twisted hair and a small section of scalp hair for maximum security.
- Adjust for Comfort: Never tolerate discomfort; adjust your clip placement until it feels secure yet gentle.
- Personalize Your Look: Don’t be afraid to pull out face-framing pieces or experiment with different twists.
Frequently Asked Questions
Can claw clips damage hair?
When used correctly, claw clips are generally gentle on hair. The key is to avoid clipping too tightly or in the exact same spot every day, which can cause tension. Choose clips with smooth edges and avoid those with sharp teeth that could snag strands.
How do I make my claw clip style last all day?
For an all-day hold, start with clean, dry hair. A little texturizing spray or dry shampoo can add grip, especially for fine hair. Ensure your twist is firm and the clip is securely catching hair from the base. Avoid touching or adjusting your hair throughout the day unnecessarily.
Are claw clips suitable for short hair?
Absolutely! Even short hair can rock a claw clip. For bobs or lobs, try half-up styles, gathering just the top section of your hair. Smaller clips work perfectly for this. You can also create mini twists at the back for a chic, understated look.
What’s the best way to clean my claw clip?
Most plastic or acetate claw clips can be gently wiped clean with a damp cloth and mild soap. For metal clips, ensure they are thoroughly dried to prevent rust. Avoid harsh chemicals that might damage the clip’s finish or material.
Our Top Recommended Finds
- Large, Matte Finish Claw Clips: These offer a strong grip for thick hair and a non-slip feel, perfect for everyday wear.
- Smaller, Acrylic Claw Clips: Ideal for half-up styles, fine hair, or adding a pop of color to your look.
- Texturizing Sea Salt Spray: Great for adding grip and volume to fine or slippery hair, helping your clip stay put longer.
Embrace Your Effortless Elegance
Mastering the claw clip is more than just styling your hair; it’s about finding an easy, chic way to express yourself. This simple accessory offers endless possibilities for quick transformations and sophisticated updos. No more struggling with complicated techniques or sacrificing comfort for style.
Take these steps and make them your own. Experiment with different twists, heights, and clips to discover what works best for your unique hair and personal aesthetic. Start clipping with confidence today and enjoy the liberation of effortless beauty.