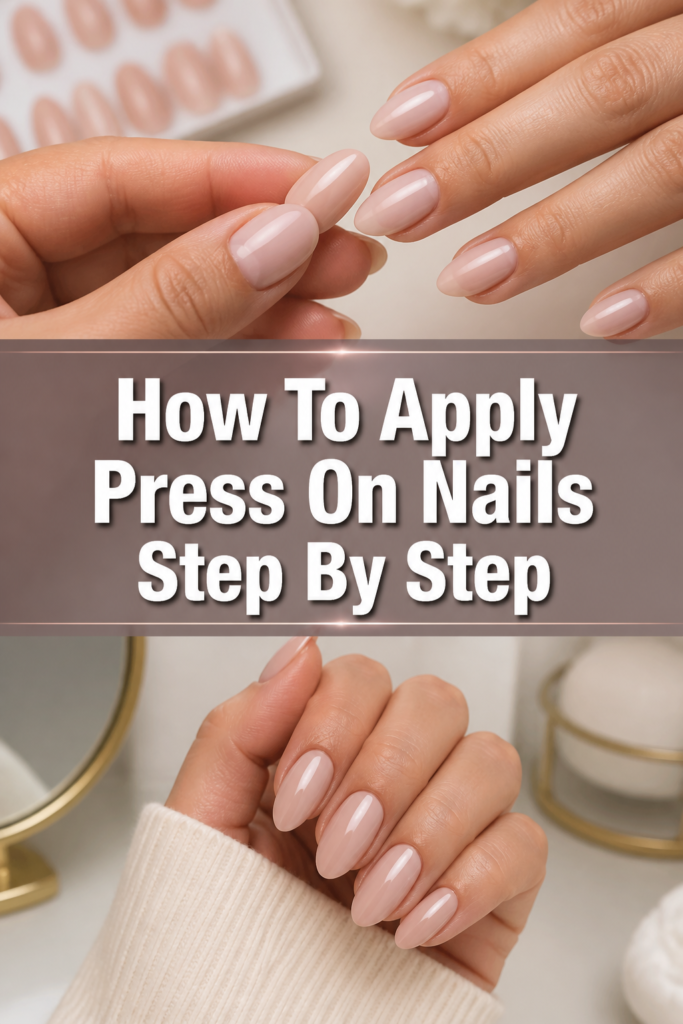
💅 How To Apply Press On Nails Step By Step
Getting a salon-perfect manicure at home can feel like a dream, but it’s totally achievable with press-on nails.
I’ve personally mastered the art of applying these beauties, making my nails look fantastic for weeks without the salon price tag.
This guide shares all my best tricks, ensuring your press-ons look natural and last longer than you expect.
Quick Overview
This comprehensive guide will walk you through preparing your nails, applying press-ons flawlessly, and making them last.
You’ll gain the confidence to achieve a professional-looking manicure from the comfort of your home.
- Time needed: 20-30 minutes
- Difficulty: Beginner
- What you’ll need: Press-on nail kit, nail file, cuticle pusher, alcohol wipe, nail glue (optional)
Step-by-Step Instructions
Step 1: Gather Your Tools & Prepare Your Space
Before you begin, lay out everything you need on a clean, flat surface. This helps streamline the process and prevents any last-minute searching.
Ensure you have good lighting to see your nails clearly during application.
- Open your press-on nail kit and familiarize yourself with its contents.
- Arrange your chosen nails, glue, and tools within easy reach.
Pro Tip: Work in a well-ventilated area, especially if you’re using extra nail glue. This helps disperse any strong odors.
Step 2: Clean and Dry Your Natural Nails
A pristine canvas is crucial for strong adhesion. Any oils, lotions, or residue on your natural nails can prevent the press-ons from sticking properly.
Take your time with this step to ensure optimal results.
- Wash your hands thoroughly with soap and water to remove dirt and oils.
- Dry your hands completely with a clean towel.
- Wipe each nail plate with the alcohol pad provided in your kit (or rubbing alcohol on a cotton pad). This removes any remaining oils.
Step 3: Push Back and Trim Cuticles
Proper cuticle care creates a larger, smoother surface for the press-on nail to adhere to. This also contributes to a cleaner, more natural look.
Be gentle to avoid any damage to your nail beds.
- Gently push back your cuticles using the cuticle pusher or orange stick. Work slowly around the base of each nail.
- Carefully trim any excess hangnails or dead skin around the cuticle area. Do not cut your actual cuticles.
Pro Tip: If your cuticles are particularly dry, apply a tiny amount of cuticle oil after pushing them back, then wipe it off completely with an alcohol pad before proceeding. This softens them without leaving residue.
Step 4: File and Buff Your Natural Nails
Creating a slightly rough surface on your natural nails provides better grip for the adhesive. This step significantly improves the longevity of your press-ons.
Avoid over-filing, which can weaken your nails.
- File your natural nails short, to about the same length as your fingertips. This prevents your natural nail from showing underneath the press-on.
- Lightly buff the surface of each natural nail using the fine-grit buffer. This creates micro-abrasions for the glue to bond to.
- Dust off any remaining nail dust with a clean brush or dry wipe.
Step 5: Size and Arrange Your Press-On Nails
Choosing the correct size for each finger is paramount for a natural look and comfortable wear. Ill-fitting nails can lift easily or look awkward.
This is a critical step that should not be rushed.
- Match each press-on nail to your natural nails. Hold them over your nail plate to find the best fit.
- Ensure the press-on covers your entire natural nail from side wall to side wall without overlapping your skin.
- Arrange the sized nails in order, from thumb to pinky, for each hand. This makes application quicker and smoother.
Step 6: Apply the Press-On Nails
Now for the main event! Whether your kit uses adhesive tabs or liquid glue, precision is key for a secure and lasting bond.
Work one nail at a time, being mindful of placement.
- For Adhesive Tabs:
- Select the correct tab size for your natural nail.
- Peel the tab from its sheet and apply it firmly to your natural nail, pressing down to remove air bubbles.
- Peel the backing off the tab, exposing the adhesive.
- Align the press-on nail with your cuticle, tilting it slightly.
- Press down firmly from the cuticle towards the tip, holding for at least 30 seconds.
- For Liquid Nail Glue:
- Apply a small dot or thin line of glue to the back of the press-on nail, or directly onto your natural nail. Avoid using too much.
- Align the press-on nail with your cuticle, tilting it slightly.
- Press down firmly from the cuticle towards the tip, holding for at least 30-60 seconds. Ensure there are no air bubbles.
Pro Tip: Apply press-ons starting with your pinky finger and working your way to your thumb. This prevents you from accidentally bumping or dislodging already applied nails.
Step 7: Finish and Refine
Once all your press-ons are applied, a few final touches will ensure they look polished and natural.
This step also helps to customize the fit and feel.
- File the edges of the press-on nails if they feel sharp or need shaping. You can gently shape them to your preferred style.
- Wipe away any excess glue that may have squeezed out from under the nail using an alcohol pad before it dries completely.
- Avoid contact with water for at least an hour (preferably longer) to allow the adhesive to fully cure.
Common Mistakes to Avoid
Skipping Nail Preparation
Many people rush straight to applying the nails without proper prep. This is a common reason why press-ons lift or fall off quickly.
Failing to clean, dry, and buff your natural nails leaves oils and a smooth surface, preventing the adhesive from forming a strong bond. Always take the time for thorough preparation.
Using Too Much Glue
It’s tempting to think more glue equals better hold, but this often backfires. Excessive glue can ooze out, create messy residue, and even weaken the bond by not allowing it to dry properly.
A thin, even layer or a small dot is usually sufficient. Less is often more when it comes to nail glue.
Incorrect Sizing
Applying a press-on that’s too wide will overlap your skin, leading to discomfort and easy lifting. A nail that’s too narrow will expose your natural nail, looking unnatural and also prone to lifting.
Always take the time to size each nail individually, ensuring a perfect fit from side wall to side wall without touching your skin.
Not Pressing Firmly Enough
Simply placing the press-on nail on your finger isn’t enough for a lasting hold. The adhesive needs firm, consistent pressure to properly bond with your natural nail.
Hold each nail down for the recommended 30-60 seconds, applying steady pressure from the cuticle to the tip, to ensure maximum adhesion.
Troubleshooting
Press-On Nails Lifting
If your press-on nails start to lift at the edges, it usually indicates insufficient prep or not enough pressure during application. Ensure your natural nails were completely oil-free and buffed before applying.
For a quick fix, you can apply a tiny drop of nail glue to the lifted area, press down firmly for 30 seconds, and wipe away any excess. For future applications, focus more on thorough nail preparation.
Nails Falling Off Quickly
If your press-ons are falling off entirely within a day or two, the issue likely lies with either poor adhesion from the start or exposure to too much water too soon. Re-evaluate your cleaning and buffing steps.
Consider using a higher-quality nail glue if your kit’s adhesive isn’t strong enough. Also, avoid showering, swimming, or excessive hand washing for at least an hour after application to let the glue fully cure.
Bubbles Under the Nail
Bubbles under the press-on nail can occur if too much glue is used or if the nail isn’t pressed down evenly from the cuticle to the tip. These bubbles can weaken the bond and make the nail prone to lifting.
To avoid this, use only a small amount of glue and apply the press-on with a slight tilt, pressing firmly and smoothly from the cuticle area outwards to push out any air.
Key Takeaways
- Thorough nail preparation is the most critical step for long-lasting press-ons.
- Always ensure your natural nails are clean, dry, buffed, and free of oils.
- Properly size each press-on nail to fit your natural nail from side wall to side wall.
- Use a small amount of glue and apply firm, consistent pressure for 30-60 seconds per nail.
- Avoid water exposure for at least an hour after application to allow the adhesive to cure.
- Correct application techniques prevent lifting, bubbles, and premature nail loss.
Frequently Asked Questions
Can I reuse press-on nails?
Yes, many press-on nails can be reused if they are carefully removed and if the original adhesive can be gently filed off. Clean them thoroughly and store them properly for future use. You’ll need to apply new adhesive tabs or nail glue for reapplication.
How long do press-on nails typically last?
With proper application and good quality products, press-on nails can last anywhere from 1 to 3 weeks. Factors like daily activities, contact with water, and initial application technique all play a role in their longevity.
How do I remove press-on nails without damaging my natural nails?
Soak your hands in warm, soapy water with a few drops of cuticle oil for 10-15 minutes. Gently use an orange stick to pry up the edges. If they don’t budge easily, soak longer. Never force them off, as this can damage your natural nail bed.
Can I paint over press-on nails?
Absolutely! Most press-on nails are made of ABS plastic, which is perfectly safe to paint over. This allows you to customize your manicure even further, giving you endless design possibilities with your press-ons.
Our Top Recommended Finds
- Professional Nail File and Buffer Set: Essential for shaping and creating the ideal surface for adhesion.
- Cuticle Pusher and Trimmer Kit: Helps with precise cuticle care for a clean, extended nail bed.
- High-Quality Nail Glue (e.g., KDS Nail Glue): Often stronger than glues included in kits, offering superior hold.
Your Perfect Manicure Awaits
You now have all the knowledge and practical steps to achieve a flawless press-on nail application.
No more expensive salon visits or chipped polish. Your nails can look salon-fresh, right from your home.
Grab your favorite press-on kit today and transform your manicure game!