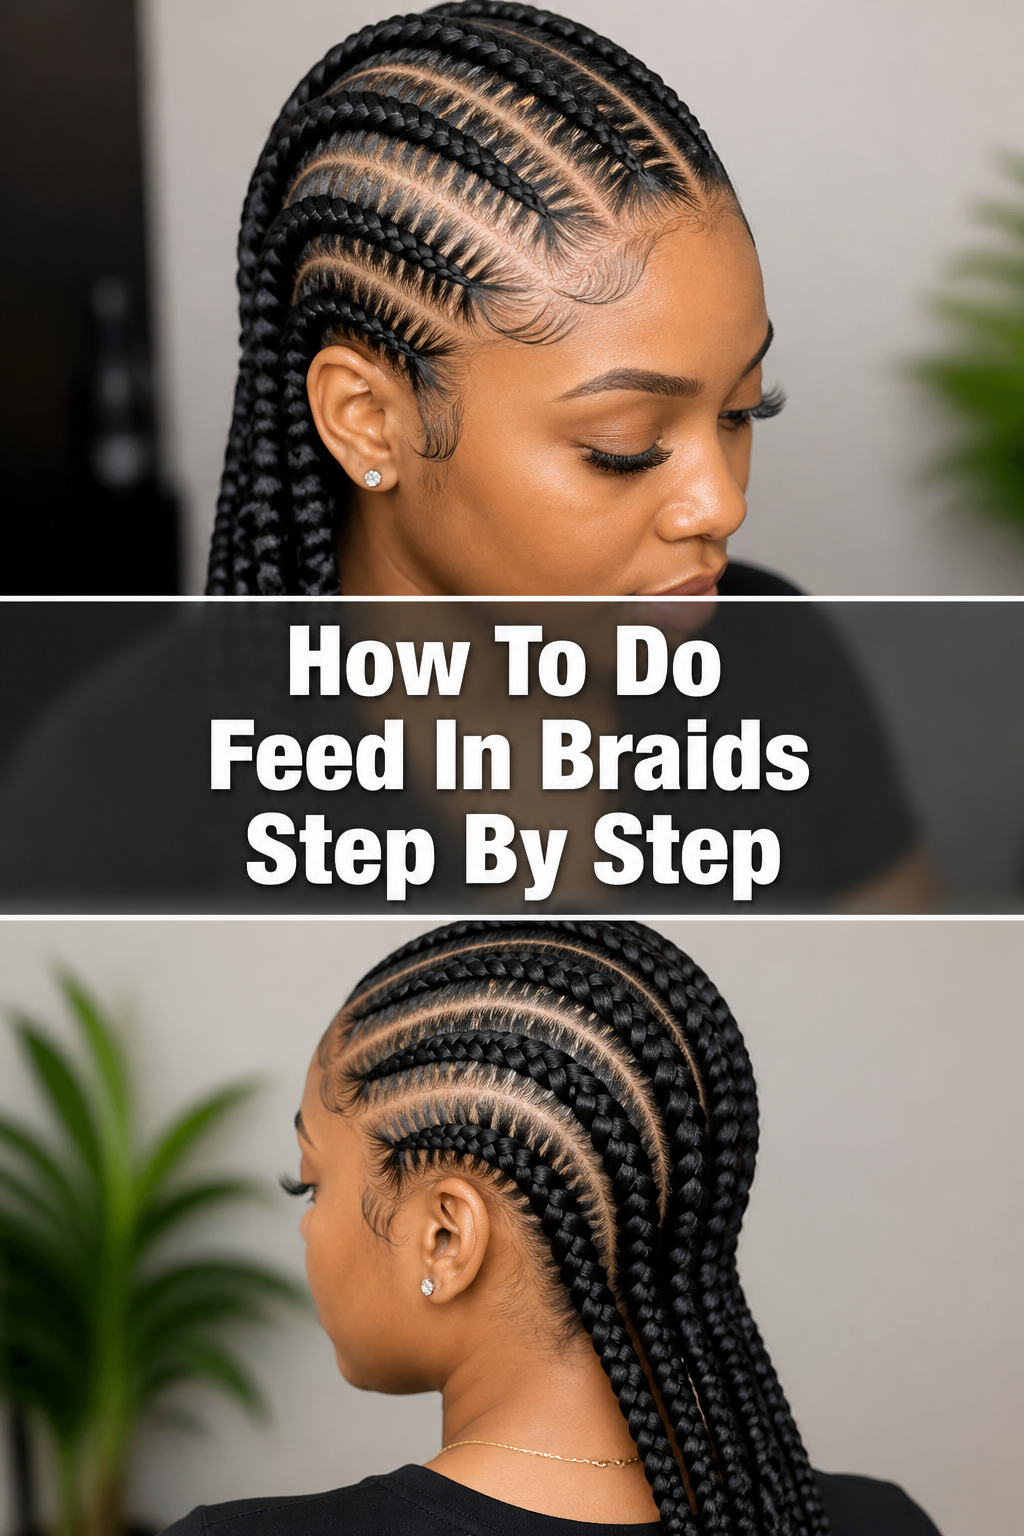
✨ How To Do Feed In Braids Step By Step
Learning to create feed-in braids can transform your hairstyling game.
It’s a rewarding skill that offers a sleek, natural-looking finish without bulky knots at the root.
I’ve spent countless hours perfecting this technique on myself and others, and I’m excited to share every detail so you can achieve flawless results right from your home.

Quick Overview
This guide will walk you through the entire process of creating beautiful, seamless feed-in braids from start to finish.
You’ll learn how to prepare your hair, section it perfectly, and master the art of adding braiding hair for a smooth, natural look.
- Time needed: 2-4 hours (depending on hair length, thickness, and desired style)
- Difficulty: Intermediate
- What you’ll need: Braiding hair, rattail comb, hair clips, edge control, hair gel, scissors.
Step-by-Step Instructions
Step 1: Gather Your Supplies
Before you begin, ensure you have all necessary items within reach.
This prevents interruptions and keeps your workflow smooth.
You’ll need high-quality braiding hair, preferably pre-stretched, as it helps create a more natural taper.
A fine-tooth rattail comb is essential for precise parting and sectioning.
Sturdy hair clips will hold unused sections out of your way.
Have your favorite edge control or hair gel ready for a clean finish.
Finally, keep a pair of sharp scissors nearby for trimming stray hairs or finishing the ends.
Pro Tip: Opt for pre-stretched braiding hair. It saves significant time and effort, as you won’t need to stretch the hair yourself for a natural taper.
Step 2: Prepare Your Hair
Start with freshly washed and thoroughly detangled hair.
Clean hair allows for better grip and a neater braid.
Apply a leave-in conditioner and a light oil to moisturize your strands.
Ensure your hair is completely dry before braiding to prevent mildew or breakage.
If your hair is naturally very curly, you may wish to blow-dry it smooth on a low heat setting.
This makes parting and braiding much easier, especially for beginners.
Step 3: Section Your Hair
Precision in sectioning is key to neat feed-in braids.
Use your rattail comb to create clean, straight parts for your desired braid pattern.
Begin by creating your first part, typically from the front hairline back.
Clip away the surrounding hair securely to keep it separate.
The size of your sections will determine the size of your braids.
Smaller sections mean smaller, more intricate braids, while larger sections create bolder styles.
Pro Tip: Use a small amount of edge control or gel along your parts as you create them. This helps define the lines and keeps flyaways down for a super crisp look.
Step 4: Begin the Base Braid
Take a very small subsection of hair at the very beginning of your first main section.
This small piece will serve as the anchor for your feed-in braid.
Apply a tiny bit of gel or edge control to this subsection for a smooth start.
Begin a standard three-strand cornrow braid using only your natural hair.
Make two or three stitches of this cornrow before introducing any extension hair.
This initial natural hair braid creates a seamless foundation.
Step 5: Introduce the First Extension Piece
Now it’s time to “feed in” your first piece of braiding hair.
Take a very thin strand of extension hair from your pre-cut pile.
The thinner the piece, the more natural the transition will be.
Lay this thin strand over the middle strand of your ongoing cornrow.
Fold the extension hair in half, so it straddles the middle strand of your natural hair.
This effectively gives you two new strands of extension hair to work with.
Pro Tip: Start with extremely small pieces of extension hair. Gradually increase the size of the pieces you feed in as the braid progresses to achieve a smooth, tapered look from root to tip.
Step 6: Continue Braiding and Feeding
Incorporate the folded extension hair into your three-strand cornrow.
Treat one side of the folded extension hair as part of your left natural hair strand, and the other side as part of your right natural hair strand.
Continue to braid, taking small sections of your natural hair into each stitch as you cornrow.
After a few more stitches, introduce another small piece of extension hair.
Repeat the feeding process: lay a thin strand over the middle braiding strand, fold it, and incorporate it.
The key is to feed in small pieces gradually as you braid down.
Step 7: Maintain Tension and Neatness
Consistent tension is crucial for neat and long-lasting feed-in braids.
Keep a firm but gentle grip on the hair as you braid.
Avoid pulling too tightly on the roots, which can cause discomfort or damage.
Ensure that each piece of extension hair is fully incorporated and secured.
Regularly smooth down any flyaways with a bit of gel as you go.
This attention to detail throughout the process makes a significant difference in the final look.
Pro Tip: If you find your hands getting tired, take short breaks. Maintaining consistent tension is easier when your hands are not fatigued.
Step 8: Finish the Braid
Once you reach the end of your natural hair, continue braiding with only the extension hair.
Braid all the way down to your desired length.
You can secure the end of the braid in several ways.
A common method is to dip the ends in hot water to seal them, creating a blunt finish.
Alternatively, you can knot the end or use a small rubber band.
Trim any stray ends for a clean, polished appearance.
Step 9: Repeat for Remaining Sections
Once your first braid is complete, unclip the next section of hair.
Carefully create a new, clean part for the next braid.
Repeat steps 4 through 8 for each subsequent section.
Ensure your parts are consistent and your braids are evenly sized.
This consistency across all braids is what gives the style its professional finish.
Step 10: Style and Set
After all braids are complete, apply a final touch of edge control to your hairline.
Use a soft brush or your fingertip to smooth down baby hairs.
Spritz a light holding spray over your entire head to set the style.
A braid sheen spray can add a beautiful shine and help moisturize your scalp.
Consider wrapping your hair with a silk scarf overnight to preserve the braids and minimize frizz.
Common Mistakes to Avoid
Adding Too Much Hair Too Soon
A frequent error is introducing large chunks of braiding hair right at the start.
This creates a bulky, unnatural bump at the root of the braid.
It defeats the purpose of the “feed-in” technique, which aims for a seamless transition.
Instead, begin with very tiny pieces of extension hair and gradually increase the volume as you braid down.
Inconsistent Parting
Uneven or crooked parts can ruin the entire aesthetic of your feed-in braids.
Sloppy sections make the braids look messy and unprofessional.
Always use a rattail comb to create crisp, straight lines.
Take your time with each part, and don’t hesitate to re-part if it’s not perfect.
Incorrect Tension
Applying too much tension can lead to painful pulling, scalp irritation, and even hair loss (traction alopecia).
Conversely, too little tension results in loose braids that unravel quickly and lack definition.
Strive for a firm but comfortable grip that keeps the braid secure without causing strain.
Your scalp should not feel tight or sore during or after the braiding process.
Neglecting Hair Preparation
Skipping proper hair preparation, such as washing, detangling, and moisturizing, can severely impact the outcome.
Dirty or tangled hair is difficult to braid, leading to frizz, snags, and an overall untidy look.
Always start with clean, thoroughly detangled, and well-moisturized hair.
This creates the best foundation for smooth, long-lasting braids.
Troubleshooting
Braid Looks Bulky at the Root
If your braid appears thick or lumpy at the very beginning, you likely added too much extension hair too early.
Try unraveling the first few stitches and restarting with a much smaller piece of braiding hair.
Remember to use incredibly thin strands for the initial feed-ins.
Gradually build up the thickness by adding more small pieces as you braid down.
Braids Are Uneven in Size
Inconsistent braid size often stems from uneven sectioning or varying amounts of hair fed into each braid.
Go back and re-evaluate your parting technique; ensure each section is roughly the same width.
Also, try to feed in similar-sized pieces of extension hair at consistent intervals for all braids.
Practice helps in developing a consistent hand for both parting and feeding.
Frizz and Flyaways
Frizz can occur if hair isn’t fully detangled, if you’re not using enough product, or if your hair is dry.
Ensure your hair is thoroughly moisturized before braiding.
Use a good quality gel or edge control on your sections and along the braid as you go.
A light mist of holding spray after braiding can also help to tame flyaways.
Key Takeaways
- Proper hair preparation, including washing, detangling, and moisturizing, is fundamental for a smooth braiding experience.
- Precision in parting with a rattail comb is crucial for achieving neat and symmetrical feed-in braids.
- Start feeding in extension hair with very small pieces, gradually increasing the size to create a seamless, natural transition.
- Maintain consistent, gentle tension throughout the braiding process to ensure neatness and prevent scalp discomfort.
- Use edge control or gel to smooth down flyaways and define parts for a polished final look.
- Practice is essential; your technique will improve with each set of braids you create.
Frequently Asked Questions
How long do feed-in braids typically last?
Feed-in braids can last anywhere from 2 to 6 weeks, depending on how well they are maintained and how fast your natural hair grows.
Proper nightly care, such as wrapping your hair in a silk scarf, can significantly extend their lifespan.
Can I wash my hair while I have feed-in braids?
Yes, you can gently wash your scalp and braids while they are installed. Focus on cleansing the scalp with diluted shampoo or a dry shampoo.
Avoid vigorous scrubbing that could loosen the braids, and ensure they are thoroughly dried afterward to prevent mildew.
What type of hair is best for feed-in braids?
Kanekalon braiding hair is most commonly used for feed-in braids due to its lightweight nature and ability to be sealed with hot water.
Pre-stretched Kanekalon hair is highly recommended as it has a natural taper, saving you prep time.
How do I protect my edges when getting feed-in braids?
To protect your edges, ensure your braider avoids pulling too tightly around your hairline.
Communicate immediately if you feel any discomfort or excessive tension.
You can also ask for the braids around your edges to be slightly looser.
Moisturizing your edges regularly can also help.
Our Top Recommended Finds
- Pre-Stretched Braiding Hair: This type of hair makes the feed-in technique much easier by eliminating the need to stretch the hair yourself, resulting in a natural, tapered look.
- Rattail Comb: Essential for creating incredibly precise and clean parts, which are the foundation of neat feed-in braids.
- Strong Hold Edge Control: A good edge control tames flyaways, defines your hairline, and gives your braids a super sleek and polished finish.
Embrace Your Braiding Journey Today
You now have a comprehensive guide to mastering feed-in braids, a versatile and beautiful protective style.
Don’t be discouraged if your first attempt isn’t perfect; every skilled braider started somewhere.
Practice truly makes perfect with this technique, so be patient and persistent.
Gather your supplies, set aside some dedicated time, and begin your braiding adventure this week.
Soon, you’ll be creating stunning, seamless feed-in braids with confidence and ease.